How to build the Village Flower Shop in Minecraft
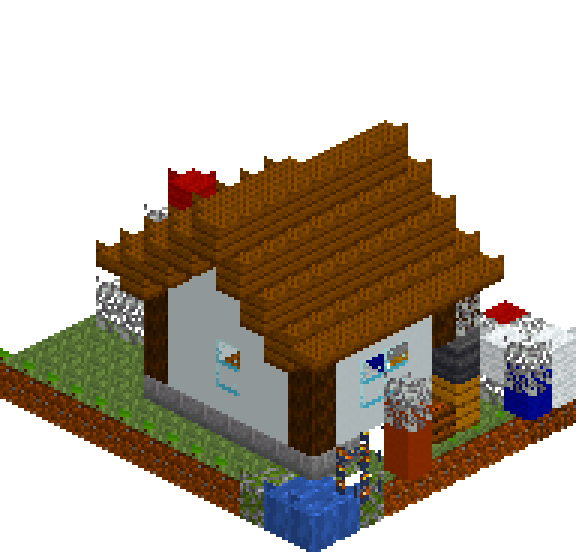
Seven blocks wide, dressed almost entirely in green wool, and unmistakably a shop that sells flowers. The frontage is one bold colour against white walls; the gable above it is glazed, so the loft catches the last of the light. Most of the charm here is bought cheaply — banked beds of red, white and blue wool spilling over the path, crates of watering cans beside the step, a lantern hung slightly off-centre over the door. It goes up in an afternoon, sits happily at the edge of a village, and rewards a slow detailing pass far more than it rewards scale.
What you need
| Block | Count |
|---|---|
| Spruce planks | 81 |
| Stone bricks | 64 |
| White concrete | 51 |
| Grass block | 48 |
| Coarse dirt | 34 |
| Oak leaves | 33 |
| Glass | 25 |
| Spruce planks slab | 23 |
| Spruce log | 22 |
| White wool | 18 |
| Red wool | 18 |
| Dirt path | 11 |
| Oak planks | 10 |
| Blue wool | 8 |
| Lantern | 6 |
| Green wool | 6 |
| Mossy cobblestone | 4 |
| Water | 4 |
| Stone slab | 2 |
| Composter | 2 |
| Terracotta | 2 |
| Hopper | 2 |
Counts are exact for the model above. Mine a little spare — nobody places every block first time.
Building it
Each stage names the layers it covers. Drag the slider on the model to that layer and you are looking at exactly what the stage describes.
1.Plot, path and the bedding
Lay a 13 by 11 rectangle of grass, then cut a dirt path two blocks wide from the front edge to where the door will be and widen it into an apron running the full width of the shopfront. Everything to the left of the path becomes coarse dirt: that is the bed, and it wraps round the corner in front of the shop as well. The building sits on a stone-brick raft at x4-x10, z3-z8, one block proud of the grass, which hands you a doorstep before you have built a door. Ring the top of that raft in stone brick and floor the middle in spruce planks. Then plant: oak leaves for the mass, with red, white and blue wool worked through in drifts of two and three.
2.The green shopfront
Corner posts first — spruce logs at all four corners, carried the full height of the wall. Fill the sides and back with white concrete and the front, between the posts, with green wool. One bold colour against a soft neutral is doing most of the work here. Now carve the openings rather than leaving gaps as you build: the door is two wide and three tall at x6-x7, sitting deliberately left of the wall's centre line, and the display window is two wide beside it at x8-x9, glazed right down to floor level so the buckets of flowers inside read from the path. Punch a two-by-two glass window into each side wall at z5-z6, and a single pane in the back.
3.Sign band, awning and lanterns
The top course of the front carries the sign: three white wool blocks at x5-x7, sitting over the door and the green panel beside it rather than centred on the wall. Above the display window, jut an awning of three spruce slabs forward one block to z2, with a fourth slab on its own above the doorway. Hang a lantern beneath each — one over the door, one under the awning — and note that they end up at slightly different points along the front, which is exactly what you want. Two matched lights at matched heights read as headlamps. Inside, stand a lantern on the plank counter and put a red bloom in the side windows.
4.Glazed gable and spruce roof
Seven across means the ridge lands three courses above the eaves, so do the sum first. The roof steps x3 and x4 at y6, x5 at y7, x6 at y8, and the ridge alone at x7 by y9, mirrored on the right. Run every course from z2 through z9 so it overhangs the walls by one block front and back. Make the outermost course a spruce slab: a half-block eave is the cheapest way to stop a roof reading as a lump of timber. Then glaze the front gable — five panes at y6, three at y7, one at y8. The back gable takes white concrete, keeping the glass a front-of-house feature. Add a spruce tie beam at y6, z5, and hang the interior lantern from it.
5.Crates, arch and the little pond
Everything that turns a shed into a shop goes on last. Stack oak-plank crates beside the step and against the right-hand wall, and top each stack with a hopper — an upturned funnel reads convincingly as a watering can at this scale. Two more crates go under the display window with wool blooms sitting on them. Build a rose arch over the path at the front edge from two spruce logs and a beam of oak leaves, with one red and one white bloom set into it. Bracket a small window box off the left wall, drop a composter and a stack of terracotta pots on the right, and finish with a two-by-two pond and a mossy rim in the back corner, with a lantern beside it.
Make it yours
- Keep the wool in drifts of two or three of the same colour rather than alternating block by block. Evenly sprinkled colour reads as noise; clumped colour reads as planting.
- The door, the sign band and the two front lanterns all sit left of the shop's centre line. Straighten any one of them and the whole frontage starts to look like a model kit rather than a building.
- Glaze the display window right down to the plinth. A window that stops a block short hides the buckets of flowers, which are the only reason the window is there.
- Build the roof from the eaves upward and count as you climb: x3 and x4, then x5, then x6, then the ridge at x7. Starting at the ridge leaves you a course short at the bottom nearly every time.
- Do not skip the pond, the arch and the crates. Half the charm is that the shop looks lived beside rather than dropped onto bare grass, and the setting costs perhaps a dozen blocks.