How to build the Tiny Greenhouse in Minecraft
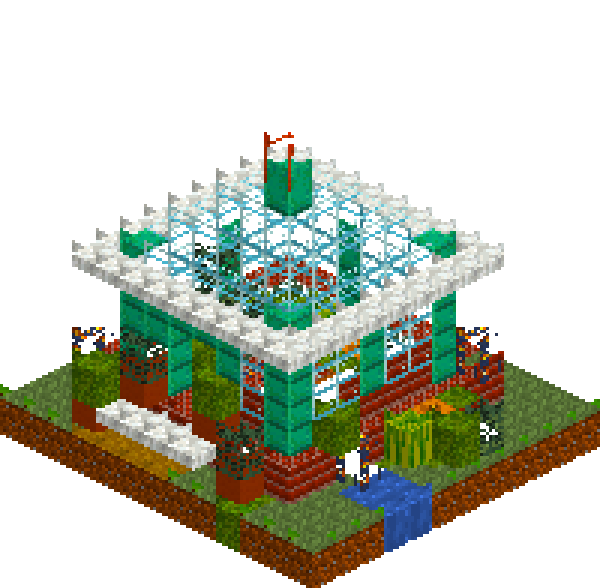
Seven blocks square, and almost every wall of it is glass. The charm is in the contrast: a squat brick plinth and knee wall doing the heavy work low down, a thin oxidised copper frame above it, and a stepped glass dome that catches the sunrise. Inside there is just enough room for two tilled beds, a sunken water trough and a composter; outside, a calcite step and four terracotta pots make it look lived in. Nothing here is difficult — the whole thing is eleven flat layers — but it reads far richer than the 450-odd blocks it costs.
What you need
| Block | Count |
|---|---|
| Grass block | 136 |
| Bricks | 85 |
| Glass | 84 |
| Oxidized copper | 40 |
| Calcite slab | 36 |
| Moss block | 16 |
| Farmland | 11 |
| Spruce leaves | 9 |
| Dirt path | 6 |
| Coarse dirt | 5 |
| Water | 5 |
| Lantern | 4 |
| Terracotta | 4 |
| Pumpkin | 2 |
| Melon | 2 |
| Composter | 1 |
| Lightning rod | 1 |
Counts are exact for the model above. Mine a little spare — nobody places every block first time.
Building it
Each stage names the layers it covers. Drag the slider on the model to that layer and you are looking at exactly what the stage describes.
1.Grass, path and brick plinth
Lay the setting first: grass across the whole footprint, a dirt path running in from the front, a patch of coarse dirt on the right for a vegetable bed and a four-block pond in the corner. On top of that goes a 9x9 brick plinth one course tall, so the glasshouse sits a step above the garden with a ledge left over for pots. Inside the plinth, swap the middle for farmland — a bed down the left side and another across the back — and sink a single water block into the right corner to keep them damp. Calcite slabs make the step at the door.
2.Knee wall, beds and the doorway
One course of brick around the plinth edge is the knee wall, and this single band is what stops the build reading as a plain glass box. Oxidised copper goes at the four corners and either side of the doorway, which is two blocks wide and deliberately off-centre so the front never looks like a symmetrical face. Fill the beds now, while you can still reach over them: moss for low planting, a melon and a pumpkin, a composter in the far corner, and a lantern set on the brick path for warm light at floor level.
3.Glass walls and the copper lintel
Three courses of glass, near enough identical. Keep oxidised copper at the corners and add one mullion at the middle of each side, so the glazing reads as framed panels rather than a fish tank. The doorway stays open for the lower two courses; on the top course a run of five copper blocks bridges it as a lintel — heavier than the opening needs, and much the better for it. Tuck a leaf block against the frame inside and it becomes a hanging basket.
4.Calcite eave and the first roof step
The eave is what makes the whole thing look designed: a ring of calcite slabs one block outside the walls, level with the top of the glass. Being slabs they read as a thin painted gutter instead of another course of wall, and the overhang throws a shadow that separates roof from frame. The glass roof begins on the same level as a 7x7 ring with copper at its corners, then steps inward to a 5x5 ring above — the two steps are what turn a pyramid into something that reads round.
5.Glass cap, finial and rod
Cap the dome with a solid 3x3 of glass, then one oxidised copper block dead centre: a finial a single block wide, which at this scale is ample. The lightning rod above it is the joke that lands — a weather vane far too grand for a shed you can cross in three strides, and the only part of the build that shows over a garden hedge. Light the lanterns before dusk and the glass glows from the inside out.
Make it yours
- Place oxidised copper rather than fresh copper for the frame: fresh copper takes real days to weather, and the frame only looks right once it has gone green. Wax any stage you like with honeycomb to hold it there.
- Farmland needs water within four blocks in every direction, which the sunken trough in the corner covers on its own — and stick to the brick path, because jumping on a bed turns it straight back to dirt.
- Swap the wall glass for glass panes if you want a slimmer look: the copper posts then stand proud of the glazing and you gain a little more elbow room inside for pots and barrels.
- Use leaf blocks for anything meant to have height and moss blocks for low, tidy planting. Mixing the two keeps the beds from reading as a chequerboard of identical green cubes.
- Build the ground and the garden before the glass. The greenhouse does not change, but the path, pond and pots end up where they actually look right instead of being squeezed in around a finished building.