How to build the Walled Garden in Minecraft
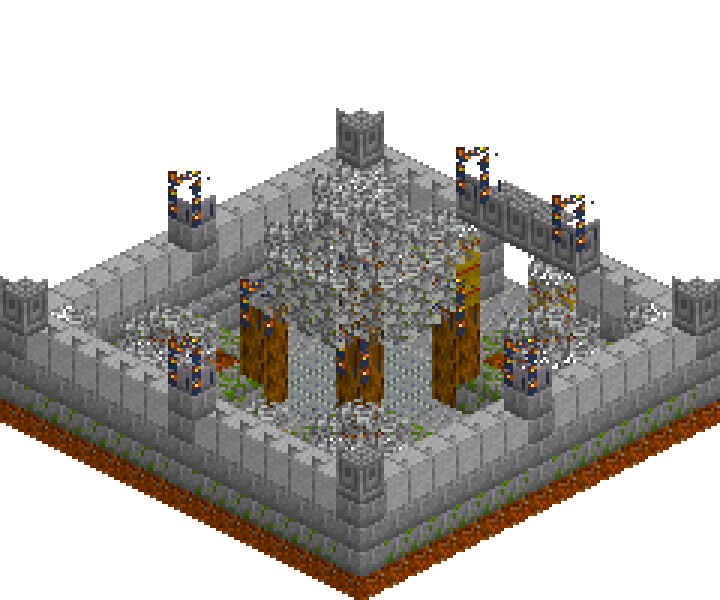
A walled garden is the cheapest way to make a base look lived in. Everything here is a rectangle: a low stone brick wall with a smooth stone coping, four raised beds framed in mossy brick, a cross of andesite path and a single oak in the middle. No redstone, no scaffolding, no roof maths — just 15 by 15 blocks of flat ground and about ten minutes. Build it against the front of a starter house and the house stops looking like a box someone slept in and starts looking like somewhere someone lives.
What you need
| Block | Count |
|---|---|
| Grass block | 153 |
| Mossy stone bricks | 100 |
| Oak leaves | 90 |
| Stone bricks | 83 |
| Andesite | 51 |
| Smooth stone | 44 |
| Coarse dirt | 37 |
| Polished andesite | 20 |
| Oak log | 18 |
| Chiselled stone bricks | 9 |
| Lantern | 9 |
| Hay block | 8 |
Counts are exact for the model above. Mine a little spare — nobody places every block first time.
Building it
Each stage names the layers it covers. Drag the slider on the model to that layer and you are looking at exactly what the stage describes.
1.Ground and the crossing paths
Flatten a 15 by 15 square of grass. That whole layer is y=0 and every other block in the build sits on top of it, so get it dead level before anything else. Cut the paths into the grass rather than laying them over it: a three-wide run of andesite at x=6 to 8 from the front edge through to z=13, and a second three-wide run crossing it at z=6 to 8. Where the two meet, swap to polished andesite in a plus shape that reaches one block past the crossing on each arm. That single change of stone does most of the work — it tells the eye where the centre of the garden is before a single wall exists. Leave one block of coarse dirt at 7,0,7 for the oak to stand in.
2.A wall you can see over
Ring the outer edge with stone bricks two blocks high, then go back and replace the bottom course with mossy stone bricks — damp ground, old wall, and it stops the base of the build looking printed. Cap the whole ring at y=3 with smooth stone. That coping is what turns a stack of bricks into a garden wall: one flat, slightly paler line running all the way round at chest height. Three blocks total is deliberate. You want to see the beds from outside and the countryside from inside, and the same layout behind a five-block wall reads as a prison yard rather than a garden.
3.Corner piers, gateway, lintel
Run all four corners up to y=4 in stone bricks and cap each with chiselled stone brick, so the corners punch a block above the coping and the silhouette stops being a flat line. Do the same either side of the entrance at x=5 and x=9 on the north wall, then knock the opening through between them at x=6 to 8, three blocks tall, and bridge the whole five-wide head at y=4 in chiselled stone brick. A lintel sitting above the coping is the difference between a gateway and a hole. Drop a lantern on each gate pier at y=5, then build three more piers, one at the midpoint of each remaining wall, and light those too.
4.Four raised beds
The paths leave four five by five squares in the corners. Fill each one solid with mossy stone bricks at y=1, then replace the middle three by three with coarse dirt. Border and soil finish level with each other and one block above the path, which is exactly how a raised bed behaves: a kerb you can sit on and a plot you never tread in. Mossy brick for the beds against clean stone brick for the wall keeps the whole build inside one material family while still giving the planting its own texture. Build all four identically — a walled garden is meant to be symmetrical, and fighting that just makes it look unfinished.
5.Planting the beds
Oak leaves are the only shrub available, so the shape you cut them into is doing all the work. In each bed lay a plus of five leaves on the soil at y=2, then one more on the centre at y=3. That four-sided mound reads as a clipped topiary from any angle and, crucially, leaves the corners of the soil showing — a solid three by three of leaves is just a green cube. Then take the bed corner tucked into each corner of the wall and run a two-block column of leaves up from it. Tall planting in the corners, low planting in the middle: the oldest trick in formal gardening and it costs four blocks.
6.Hay planters, posts and benches
Four hay bale planters, two blocks tall, replace the bed corners flanking the gate path at 5,1 and 9,1 and again at 5,13 and 9,13, each finished with a single leaf on top. Hay is the warmest thing in the palette and two stacked reads as a woven planter rather than a crop. The four bed corners that face the centre take oak log posts three tall with a lantern on each — light where the paths actually cross, which is where you walk at night. Finish with three low stone brick benches, one at the end of each path arm that doesn't have the gate, so every route through the garden ends at something.
7.The oak in the middle
Canopy first, trunk second, so the log punches up through the leaves cleanly instead of being buried by them. Two leaf layers at y=5 and y=6 covering five by five with the four corners left off, a full three by three at y=7, then a plus of five on top at y=8. Now run oak log from y=1 to y=6 straight up the centre at x=7, z=7, and it will overwrite the leaves it passes through. The canopy hangs four blocks clear of the path so nobody walks into it, and it reaches just far enough to throw shade over the four lantern posts. Small tree, small garden — anything bigger swallows everything you just built.
Make it yours
- Swap the mossy stone brick bed edging for plain bricks if the garden sits beside a red-roofed house — the wall stays stone and the beds pick the roof colour up instead.
- The gate is on the north wall only because that is where the walkthrough put it; move the three-block clear and the two piers to whichever wall faces your front door.
- On a slope, keep the whole 15 by 15 at one level and let the wall bury itself on the downhill side. A garden wall that steps with the terrain reads as broken rather than rustic.
- Trade the four oak log lantern posts for stripped spruce if your biome already reads dark — the paler log keeps the centre of the garden legible at dusk.
- Leave one bed empty and plant real crops in it in survival. The stone kerb already stops you trampling the soil, so it works as an actual farm plot, not just decoration.