How to build the Quarry Mining Outpost in Minecraft
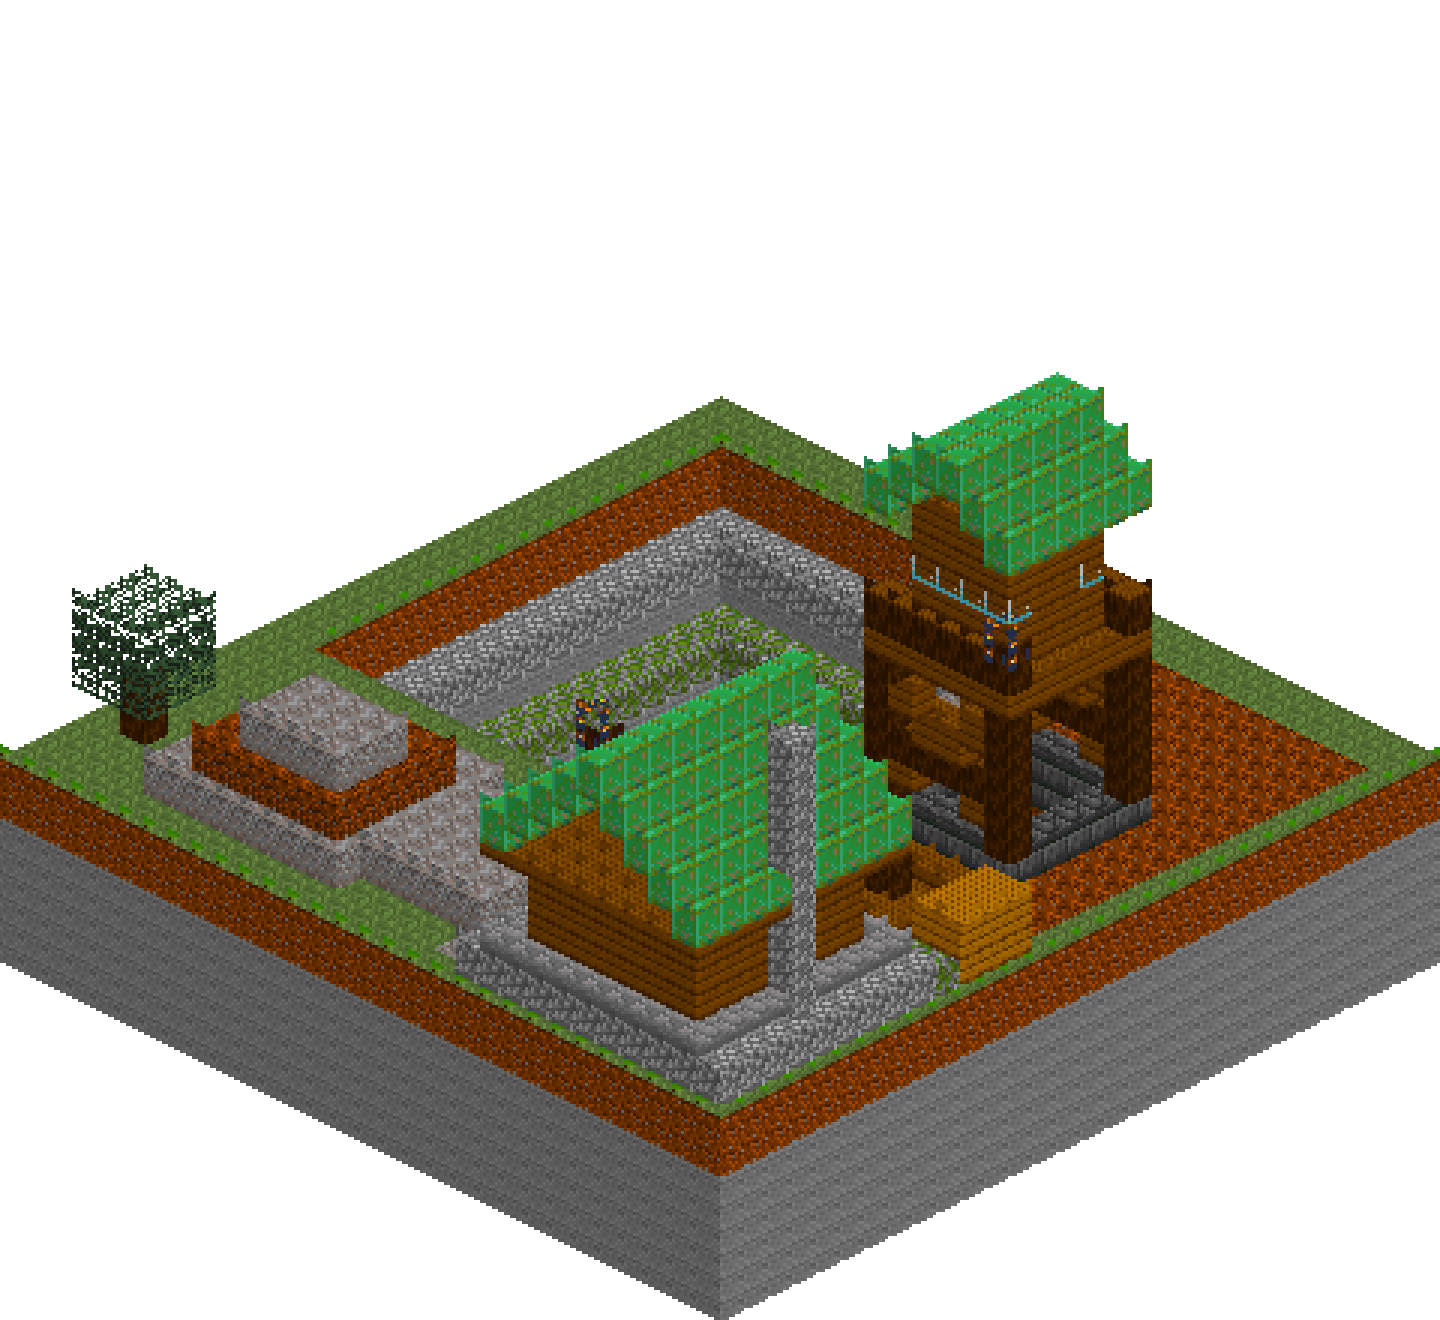
Most mining builds stop at a hole in a hillside. This one is a working site: three cut terraces stepping down to a wet andesite floor, a copper seam left half-dug in the lower wall, and a spruce headframe straddling a shaft that genuinely drops through the ground to daylight-free darkness. Around it sits the rest of the operation — a winch platform with its drum, loaded ore carts on a gravel haul road, crates, spoil heaps and a supervisor's hut with a chimney. It reads as a place people work rather than a decoration, and almost all of that comes from cutting the pit properly and letting the ground do the storytelling.
What you need
| Block | Count |
|---|---|
| Stone | 4646 |
| Dirt | 629 |
| Grass block | 400 |
| Cobblestone | 231 |
| Gravel | 194 |
| Spruce planks | 191 |
| Coarse dirt | 158 |
| Weathered copper | 116 |
| Spruce planks slab | 96 |
| Deepslate bricks | 89 |
| Mossy cobblestone | 84 |
| Spruce log | 56 |
| Andesite | 38 |
| Stone bricks slab | 31 |
| Spruce leaves | 25 |
| Glass | 18 |
| Gray wool | 14 |
| Dark oak planks | 12 |
| Oak planks | 12 |
| Tuff | 11 |
| Water | 9 |
| Lantern | 5 |
| Bookshelf | 4 |
| Stripped spruce log | 4 |
| Copper block | 3 |
| Furnace | 1 |
Counts are exact for the model above. Mine a little spare — nobody places every block first time.
Building it
Each stage names the layers it covers. Drag the slider on the model to that layer and you are looking at exactly what the stage describes.
1.Ground, yard and haul road
Lay the whole plot as stone to y5, cap it with a course of dirt at y6 and grass at y7. That sandwich matters: when the pit is cut, the rim shows soil sitting on rock the way a real cut face does, and you get it for two ops instead of hand-painting every wall. Then scuff the working half — coarse dirt across x15-28 kills the golf-course green where the machinery lives — and run a three-wide gravel haul road down x17-19 from the north edge all the way to the hut. That road is the spine everything else hangs off, so place it before the buildings and let them overwrite it where they land.
2.Cutting the terraces
Work down, not up. Clear the top two layers over the widest footprint, then floor that shelf with cobblestone. Clear the next pair inset two blocks and floor it with mossy cobblestone. Clear the last pair and lay andesite. Three passes give three benches with a clean two-block riser between each, and three different stones read as three different ages of digging. Drop a tuff seam into the lowest riser with a short run of copper block through its middle — a vein somebody is still chasing. Gravel and a shallow pool of water in the sump finish it, then three single cobblestone treads step you down from road to floor.
3.Shaft collar and timber legs
Set two solid courses of deepslate brick where the shaft will be, then clear a four-by-four straight down through them to y1. Building the collar first and cutting afterwards leaves a clean one-block kerb at ground level — the thing that stops you walking into your own shaft — and it costs three ops instead of a dozen. Cross both long faces with plank diagonals before you raise the spruce log legs, so the legs overwrite the brace ends and the corners stay honest logs. A girt at y11 ties front and back together exactly where the diagonals cross.
4.Winding deck, cabin and copper cap
Deck the frame over at y15 and give it a log rail along both long edges, with a lantern on opposite corners so the working level glows. The cabin is deliberately small — four by four outside, a two-by-two floor with three blocks of headroom — because a hoist operator needs a window, not a lounge. Band it with glass at y18. Cap everything with a weathered copper gable spanning six across, which rises exactly two to land its ridge at y23 and overhangs the cabin by a block on every side. Green metal against spruce is the whole colour story of the build.
5.The winch platform
South of the frame, a plank deck at y8 with slab kerbs along both long edges — half a block of edging is enough to stop it reading as a rug thrown on the grass. Two spruce posts carry a stripped log drum at y11, and that is the winch. Keep it low and squat. The contrast between this stubby machine and the tall lattice beside it is exactly what gives the site its silhouette, and a grey wool cable dropping the full depth of the shaft explains what the whole frame is for.
6.The supervisor's hut
Raise a cobblestone plinth a block above the yard, moss its front edge, and skirt the walls with a stone brick slab course at y9 — that skirt is two ops and it stops the timber meeting the ground flat. The shell is spruce, five courses tall with three blocks of headroom inside, a door facing the works and a window either side of it so whoever sits here can watch the pit. A slab course at y13 throws an eave, then the same weathered copper gable as the headframe, nine across and rising four to y18. A cobblestone chimney climbs the east wall and pierces the roof.
7.Spoil, carts and lamplight
Nothing sells a quarry like the muck it produces. Stack a heap in three shrinking boxes — gravel, coarse dirt, gravel — so the sides step naturally instead of forming a neat pyramid, then add a second flatter heap nearer the road. Two dark oak carts sit on the haul road, one loaded with gravel and one waiting empty. Crates by the winch, a spruce log lamp post with a lantern on top at the pit rim, and one small spruce at the far corner to prove the site was cut out of somewhere that used to be woodland.
Make it yours
- Cut the pit from the top down and floor each bench before you clear the next — you always know which layer you are standing on, and the two-block risers stay square.
- Build the shaft collar solid first, then clear the hole straight through it. Carving the hole first and trying to ring it afterwards costs four times the blocks and never lines up.
- Never use a hollow box that is only one block tall. Every block in it sits on both the top and bottom face, so it fills solid — draw thin rims and rails as separate strips instead.
- Do the gable sum before you set the wall height: a roof nine blocks across rises four, so the hut walls must stop at y13 for the ridge to land at y18 rather than through the sky limit.
- Weathered copper is the cheapest way to date a build. Over spruce it reads as corroded sheet roofing, and using it on both the hut and the headframe ties them into one site.