How to build the Sci-Fi Outpost in Minecraft
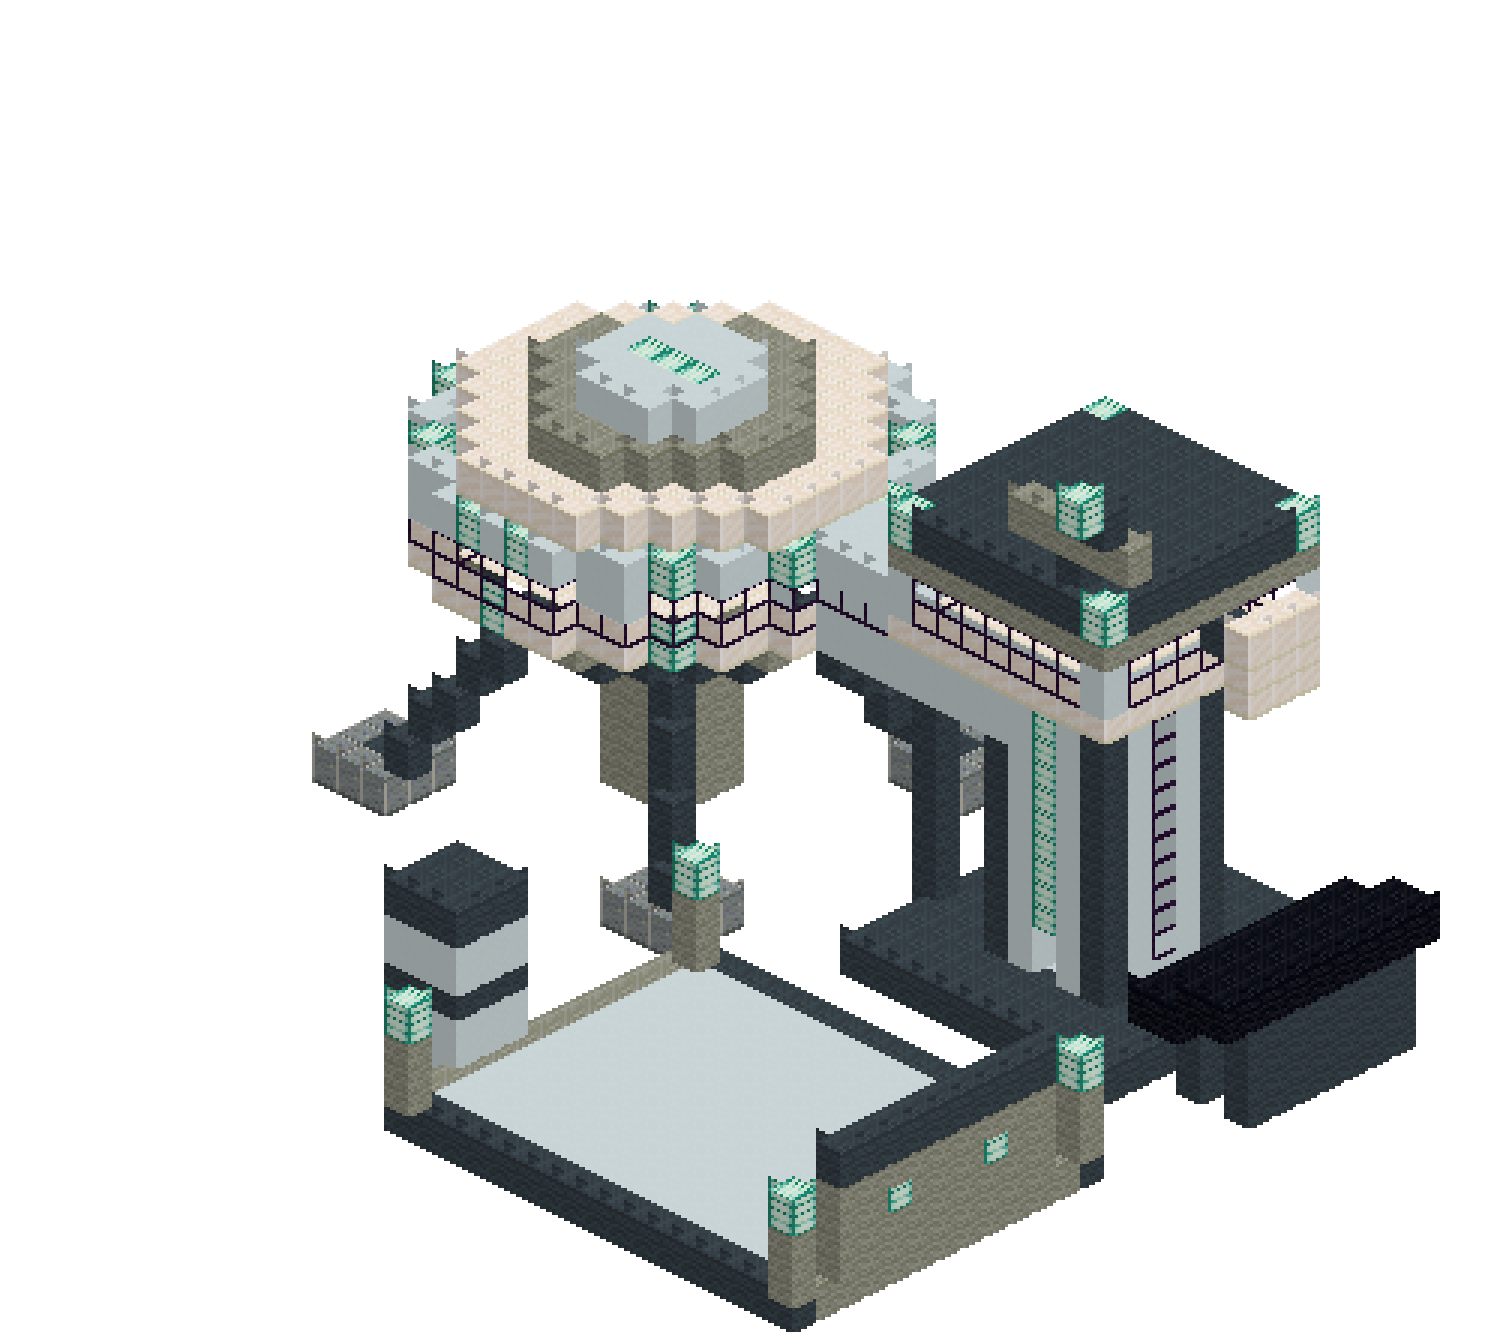
A research station assembled from two deliberately mismatched volumes: a lens-shaped habitat pod balanced on four splayed lander legs, and a slim control tower whose glass cab flares out two blocks on every side at the top. A glazed tube runs between them at deck height, and a marked pad sits below with lit corner posts and a blast wall. Almost all of it is quartz, white concrete and two greys — the colour does nothing, so the shape has to carry the whole build. Sea lanterns go in as thin dashed strips rather than floodlights, and that restraint is what makes the white read as engineered rather than blank.
What you need
| Block | Count |
|---|---|
| Gray wool | 505 |
| White concrete | 489 |
| Light gray wool | 398 |
| Quartz block | 374 |
| Tinted glass | 163 |
| Sea lantern | 54 |
| Black wool | 36 |
| Polished andesite | 32 |
Counts are exact for the model above. Mine a little spare — nobody places every block first time.
Building it
Each stage names the layers it covers. Drag the slider on the model to that layer and you are looking at exactly what the stage describes.
1.Pad, apron and ground markings
Everything starts flat. Lay a 17 by 13 deck of light grey wool at x16-32, z15-27, then run a hollow one-high box of white concrete just inside it — a hollow box at a single height gives you a painted ring in one move rather than forty. Two uprights and a crossbar make the H in the middle. Darker grey wool along z15 and z27 turns the pad edges into kerbs. Over at the tower site, a smooth stone apron sits inside its own grey ring. Four three-block posts of light grey wool at the pad corners are each capped with a single sea lantern at y4, and a blast wall runs down the eastern edge at x32 from y1 to y4 with a grey coping course on top and two lanterns sunk into its face.
2.Splayed legs and the core pylon
The habitat pod never touches the ground, and the gap underneath is half the drawing. Set four three-by-three polished andesite foot pads at the corners of the x0-14, z0-14 square. From each pad run a single diagonal line of grey wool climbing inward: (1,0,1) up to (4,6,4), and its three mirrors. Because the line moves one block on all three axes per step it reads as a true splayed lander leg rather than a stair. In the centre, a three-by-three column of light grey wool rises from y0 to y6 as the lift core, with a one-wide slot of tinted glass cut into its northern face from y1 to y5. Resist filling the rest of the void with pipework.
3.The lens: cross-sections y7 to y10
This is the whole technique. Four stacked layers, each one a wider disc than the last, turn a pile of boxes into a curve. At y7 the underbelly is only seven blocks across in grey wool with a three-by-three sea lantern core glowing straight down at the legs. At y8 it opens to eleven, still grey. At y9 it reaches thirteen in light grey wool, and at y10 it hits its full fifteen in quartz — the widest point, and the floor of the interior. That top disc carries eight sea lanterns dropped into the outer ring at the cardinal points and the diagonal shoulders, so the rim is dashed with light instead of ringed by it.
4.Glass band, rim strip and cap
Above the floor the layers switch from solid discs to outlines, which is what hollows the pod out. Draw the fifteen-wide octagon's perimeter only at y11 and y12 in tinted glass, swapping the four shoulder pairs at y12 for white concrete so the band gets vertical ribs. At y13 the same outline goes in white concrete with sea lanterns alternating along the straight runs — a dashed strip light circling the pod at eye height. Then it closes: a solid thirteen-wide quartz disc at y14 roofs the interior and steps in one block, nine-wide light grey wool at y15, and a five-wide white cap at y16 with a three-by-three lantern core as the sensor dome.
5.Control tower shaft
The second module answers the pod by being everything it is not — narrow, vertical and hard-edged. A hollow white concrete shell from (22,0,4) to (26,13,8) gives a five-by-five shaft fourteen tall. Run grey wool up all four corners as ribs so the white face reads as panels between structure. On the southern face, a vertical sea lantern strip climbs from y3 to y12 directly above the doorway, which is simply a two-block clear at (24,1,8). Tinted glass strips go up the eastern face and partway up the western one. Finally, clear a three-by-three shaft through y13 and y14 so the stairwell opens into the cab above.
6.Flared cab, mast and dish
The cab overhangs the shaft by two blocks on every side, which is what makes the tower read as a control tower rather than a chimney. Build a hollow tinted glass box from (20,14,2) to (28,17,10), then overwrite its underside with quartz and its top with light grey wool so only the two-high band between them stays glazed. White concrete posts at the four corners break the glass up. A hollow grey ring at y18 forms the roof parapet with a sea lantern at each corner. The mast leans deliberately: one line from (26,18,8) out to (28,23,11), crossed by a five-block arm at y21 and beaconed with a lantern at the tip. A grey arm carries a three-by-three quartz dish out past the eastern glass.
7.Tube, solar array and outlying kit
The link runs at deck height. A hollow white concrete box from (13,10,6) to (22,13,8) makes a three-wide tube; replace its two side walls at y12 with tinted glass for a continuous window, then clear a single line from (13,11,7) to (22,12,7) — that one cut punches the walkway through the pod wall, the tube's end caps and the tower wall all at once. A slim grey pylon at x18 holds the span. East of the tower, two black wool panels at y3 and y4 on grey fins give a tilted solar array, and a squat white concrete tank with two grey bands sits west of the pad at x13-15, z22-24 to break up the empty ground.
Make it yours
- Cut every lantern run into dashes — one lantern, one white block, one lantern. A solid ring of sea lantern glares, flattens the curve and turns your carefully stepped rim into a white blur.
- Use tinted glass, never plain glass. Plain glass goes invisible from twenty blocks away and the viewport band vanishes with it; tinted reads as a dark line and keeps the band legible against all that white.
- The lens only holds together if each disc steps in or out by exactly one block per layer. Count the end positions of every row before placing anything — a single row two blocks off shows up as a dent from every angle.
- Lean the mast. A perfectly vertical antenna is inert; running two across and three along over five of height gives the whole outpost a direction and stops the tower reading as a stack of boxes.
- Leave the space beneath the pod empty. The urge is to fill it with pipes and crates, but the daylight between the splayed legs is exactly what sells the module as landed rather than built up from the ground.