How to build the Obsidian Spire in Minecraft
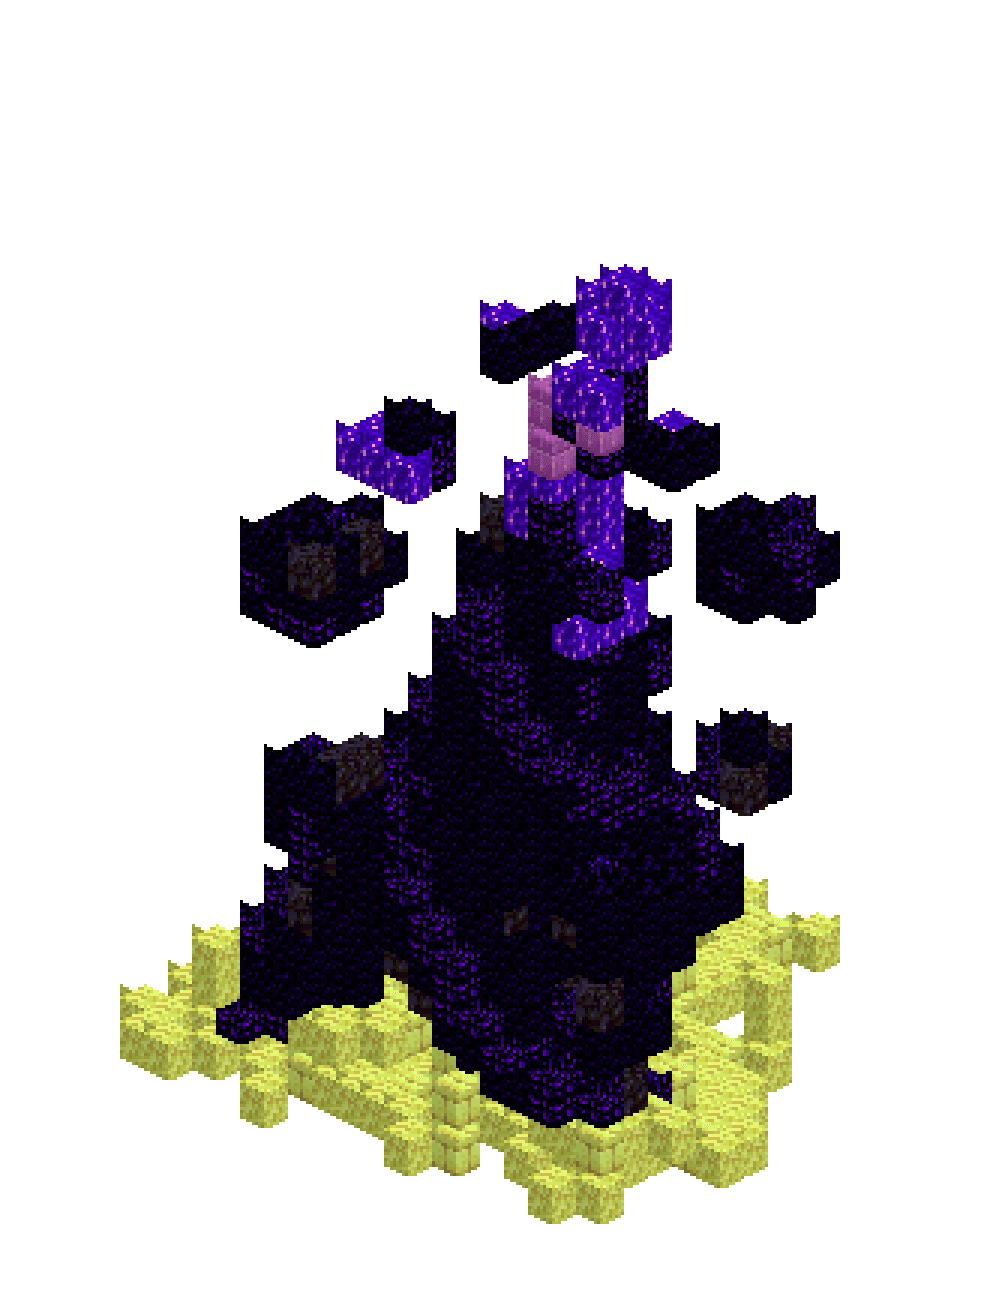
Three obsidian roots claw out of a cracked end stone island and lift a black needle thirty blocks into the air, twisting a quarter turn as it climbs and leaning as it goes. Two crying obsidian ridges wind up the shaft like glowing seams, broken chips of the spire hang motionless around it, and the whole thing finishes in an amethyst point with a single gem floating clear of the tip. Almost all of it is one material, so every bit of the drama has to come from shape — which is precisely why it is worth building.
What you need
| Block | Count |
|---|---|
| Obsidian | 828 |
| Crying obsidian | 192 |
| End stone | 187 |
| End stone bricks | 63 |
| Blackstone | 52 |
| Amethyst block | 39 |
| Purpur block | 3 |
| Budding amethyst | 1 |
Counts are exact for the model above. Mine a little spare — nobody places every block first time.
Building it
Each stage names the layers it covers. Drag the slider on the model to that layer and you are looking at exactly what the stage describes.
1.Shatter the ground before you build on it
The island is a lobed blob, never a circle — push the edge out to nine blocks in three places and pull it back to six between them, then run five hairline fissures outward from the middle so the plate reads as broken rather than paved. Leave roughly one block in seven empty at random and fleck end stone bricks through the plain end stone at about one in five; the two shades are close enough to read as the same rock, cracked. Throw a handful of loose blocks past the edge and float two of them a block or two up — debris still settling. Finish with three small raised plinths where the roots will land.
2.Three roots and the arches between them
At y=1 the cross-section is not one shape but four: a slim four-wide stem in the middle and three fat discs sitting six blocks out from it, spaced at 120 degrees. Every course after that, march the discs a little closer in and let them swell — roughly half a block inward and a quarter block wider per layer. They graze the stem around y=5, and by y=7 they have swallowed it entirely and the section is one solid ten-wide mass. The air you trap between stem and disc, and between disc and disc, is the whole point: that is your arch, and the spire looks like it is standing on claws rather than sitting in a hole.
3.Rotate the section as you shrink it
From here up it is a single rounded square, and three things change together each course. It shrinks — about a quarter block of radius per layer, faster low down and slower high up so the profile is concave, not a cone. It rotates — six degrees a layer, which is a quarter turn by the time you reach the top. And its centre drifts: nudge it a fraction along x each course and a smaller fraction along z, so by the peak the middle has walked nearly three blocks and the whole tower leans. Keep the corners of the square crisp. A circle rotated is still a circle and the twist vanishes.
4.Veins that wind faster than the stone
Two crying obsidian ridges, exactly opposite each other, running up the outside. Set them a single block proud of the surface so they catch light on their own edge, and rotate them thirteen degrees per layer — much faster than the six degrees the body turns. Because they outrun the shaft, they sweep visibly across the face as you look up, which is what sells the spiral from ground level. Thin them as the tower thins, from a block wide at the base to a single block at the shoulder, and stop them at y=20 before the shaft gets too slender to carry a ridge without looking bitten.
5.The needle and the crown that hangs off it
Above y=21 the section is three wide, above y=25 only two, and the palette changes with it: amethyst blocks dominant, purpur as a second purple, crying obsidian for the glow. Stop the stone dead at y=27. Leave y=28 completely empty — that gap is doing more work than any block in the build. Then set a small octahedron above it: one amethyst at y=29, a five-block plus at y=30 with budding amethyst at its heart, one amethyst at y=31. It reads as the crown having torn loose from the point and stayed there.
6.Shards held in orbit
Twelve lumps, roughly eight to thirty blocks each, sitting four to eight blocks out from the axis and spiralling up as they go round — so the eye follows them anticlockwise and skyward. Three rules keep them from looking like rubble. Never let one touch the shaft; two blocks of clear air minimum. Make each one wider than it is tall, so it reads as a flake off the tower rather than a boulder. And grade the material: the low shards are obsidian with crying obsidian chips, the high ones near the peak are mostly amethyst, as though the purple is spreading outward from the crown.
Make it yours
- Run a temporary scaffold pillar up the exact centre line and mark the four corners of each cross-section with a spare block colour before you fill the layer. A corner half a block out of place reads as a kink in the twist from a hundred blocks away.
- Crying obsidian gives off light level 10 and plain obsidian gives off none, so the veins genuinely glow while the shaft stays properly black. Resist adding any other light source — the whole effect depends on light only ever escaping through the seams.
- Obsidian takes about 9.4 seconds a block to mine even with a diamond pickaxe, so a mistake is expensive. Block the full silhouette out in black wool first, walk round it, fix the taper, and only then swap material layer by layer.
- Check the lean from all four sides. It should be obvious from one direction and almost invisible from the one at right angles to it — that asymmetry is what stops the tower reading as a plain cone.