How to build the Cherry Blossom House in Minecraft
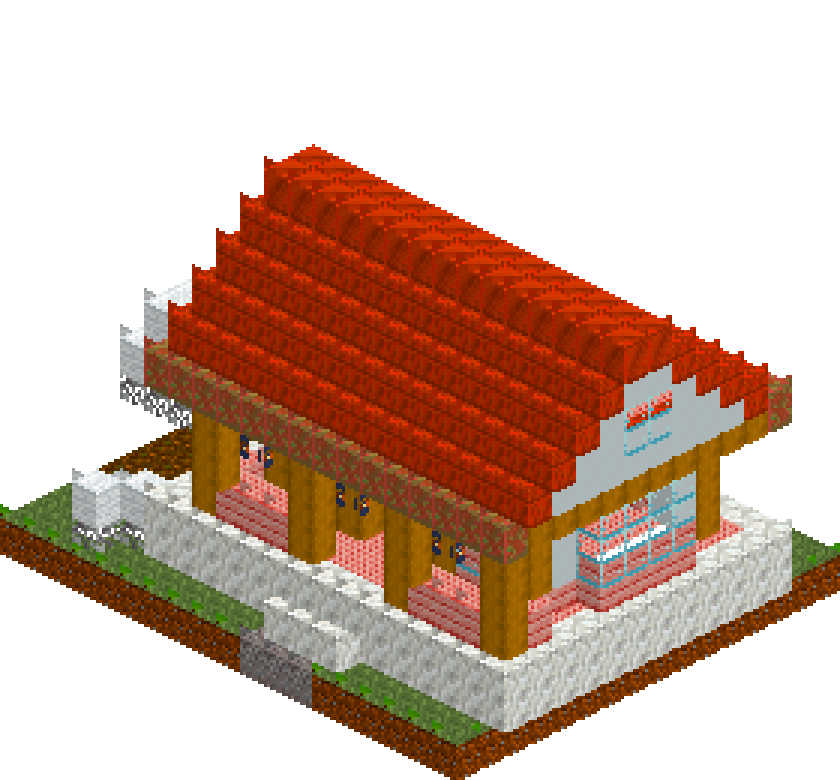
A cherry grove is the best-looking ground Minecraft hands you for free, and most people drop a plain oak box in the middle of it. This is the house those trees deserve: a low, wide, pale build in cherry planks and white concrete, lifted clear of the grass on a calcite podium and capped with a copper gable that will green over time. The front is almost entirely glass under a deep covered veranda, and both flanks push a one-block bay outwards so the walls never read flat. Roughly 19 by 16 on the ground, five blocks of headroom inside, and nothing in it you cannot gather before your first diamond pickaxe.
What you need
| Block | Count |
|---|---|
| Cherry planks | 275 |
| Grass block | 273 |
| Calcite | 233 |
| Cut copper | 132 |
| Stripped oak log | 89 |
| White concrete | 57 |
| Glass | 55 |
| White wool | 43 |
| Exposed copper | 30 |
| Copper block | 30 |
| Oak leaves | 29 |
| Podzol | 28 |
| Light gray wool | 12 |
| Oak log | 8 |
| Bookshelf | 6 |
| Glowstone | 4 |
| Gravel | 3 |
| Lantern | 3 |
| Crafting table | 1 |
| Furnace | 1 |
Counts are exact for the model above. Mine a little spare — nobody places every block first time.
Building it
Each stage names the layers it covers. Drag the slider on the model to that layer and you are looking at exactly what the stage describes.
1.Calcite podium and the plank floor
Lay grass over the whole plot first so you can see where the house sits, then drop podzol under the left-hand garden — it kills the flat grass-green and gives the blossom something brown to sit against. The podium is a solid calcite slab from x4 to x18 and z2 to z13, one block proud of the ground, with a second calcite course on top at y=2. Floor the middle of that in cherry planks, x5 to x17 and z3 to z12, which leaves a one-block calcite lip running right round the building. That lip does real work: it is the base course, it stops the pink planks touching the grass, and it gives the veranda a clean edge to stop at. Three gravel blocks and a single calcite step at the front mark the way in.
2.Wall shell, posts and panel bands
Walls go up as one hollow cherry box from [6,3,3] to [16,7,10], then carve the inside out with a clear from [7,3,4] to [15,7,9]. That leaves four clean walls five blocks tall and an interior with five blocks of headroom, which is about the minimum before a room starts feeling like a crate. Now break the material up vertically: keep cherry planks at y=3 as a skirting course and y=7 as a lintel course, and replace everything between with white concrete. Finally stand stripped oak logs at the four corners and at x=9 and x=13 on both the front and back walls, full height y=3 to y=7. Three horizontal bands plus eight posts turn a flat pink wall into a framed one, and the posts give the eye something to measure the windows against.
3.Windows, doorway and the two side bays
Glass goes in as bands between the posts, never as single punched holes. Front wall at z=10: three-high glazing from y=4 to y=6 in the bays at x7-8 and x14-15, a three-wide doorway cleared at x10-12 from y=3 to y=5, and a glass transom above it at y=6 so the entrance still reads as glazed. The back wall gets a shorter band at y=5-6 only — you want light there, not a view, and the solid strip below carries the bookshelves. Then the best bit: on each flank build a cherry panel one block outboard at x=5 and x=17 spanning z5 to z8, glaze its middle, and clear the wall behind it from y=4 to y=6. Cap each with a strip of cut copper at y=8. Thirty-odd blocks buys you genuine depth on both long elevations.
4.Ceiling and the copper gable
Ceil the room at y=8 in cherry planks across x6-x16, z3-z10 — it hides the attic and gives the glowstone somewhere to live. Then run the gable from [4,8,2] to [18,13,13] with the ridge along x, in cut copper. Do the arithmetic before you place it: the roof spans twelve blocks across z, so it rises five levels and tops out at y=13, which is exactly why the build is fourteen tall. It oversails the back wall and reaches the whole way over the veranda at the front. Swap the two eave courses at y=8 for exposed copper and the two ridge rows at y=13 for solid copper blocks — a weathered drip edge and a bright cap read as a roof that has been rained on, rather than as a triangle.
5.Closing the gable ends
The gable lays two slopes and leaves both ends open, so fill them at x=4 and x=18, one row per level, stepping in behind the copper each time: z3-12 at y=8, z4-11 at y=9, z5-10 at y=10, z6-9 at y=11, and z7-8 at y=12. The ridge row at y=13 is already closed by the copper itself. Make the bottom row stripped oak so it reads as a tie beam carrying the gable, and everything above it white concrete — a big flat white triangle is what makes the copper actually look like copper. Punch a two-by-two glass attic light at z7-8, y10-11 in each end. It is the only opening on those faces and it stops the white going blank.
6.The covered veranda
This is what makes it a house you want to stand outside of. The deck is already there in cherry planks at y=2, z11-z12. Stand four stripped oak posts at z=12 on x5, x9, x13 and x17 running y=3 to y=7, and beam across their tops. They sit one block in from the eave, so the roof visibly oversails them rather than landing on them — that shadow line is half the effect. Rail between the outer posts with a single course of cherry planks at y=3, leaving x10-12 open as the way in, and return one block of rail at each end. Hang three lanterns at y=6, a block below the beam: flush under it they disappear, one down and they throw light across the deck and the rail.
7.Lighting and the inside
Set four glowstone blocks straight into the cherry ceiling at y=8. They light the whole floor evenly, they cannot be griefed by a stray mob spawn, and from outside you only ever see the glow through the glass. Line the solid centre of the back wall with bookshelves at x10-12, y3-4, with the crafting table and furnace beside them at x7-8. A two-by-two of white wool at x14-15, z8-9 does duty as a low futon, and a patch of light grey wool set flush into the floor at y=2 reads as a rug. Keep the middle of the room empty. The entire point of that glass front is the view through it, and furniture parked in the sightline undoes the work.
8.Blossom, podzol and the approach
One large blossom tree and one small one along the left edge. Build the big crown first — oak leaves across x0-3, z6-10 at y=4, white wool over the same footprint at y=5, and a tighter white cap at y=6 — then run the oak log trunk up through it from y=1 to y=5 so it punches through the leaves instead of stopping under them. The small tree is the same trick at three blocks tall. White wool over dark leaves is the nearest this palette gets to blossom, and it only works because the podzol underneath is brown. Two more leaf-and-wool shrubs near the gravel path finish it. Resist filling the garden: the empty podzol is what makes the house look sited rather than plonked.
Make it yours
- Swap the stripped oak posts for stripped spruce if you build this on a dark forest edge or a snowy slope — the cooler grey holds up against dim ground, and the cherry planks stay the one warm note.
- The one-block side bays are the whole depth trick. If a wall of yours ever looks flat, push four or five blocks of it out by one and cap the top with a copper or stone strip, rather than reaching for another material.
- Wax every copper block if you want the roof to stay orange. If you want it green, wax only the ridge and the two eave courses — the field weathers around a bright outline and it looks deliberate instead of neglected.
- Site the house on the edge of a cherry grove, not the middle of one. The white-wool crowns here read as blossom because they sit against podzol and dark leaves; ringed by actual pink trees they vanish completely.
- If the ground slopes, extend the calcite podium down on the low side instead of terraforming flat. A taller plinth is cheaper than a hundred dirt blocks and it makes the build look anchored.