How to build the Floating Island Base in Minecraft
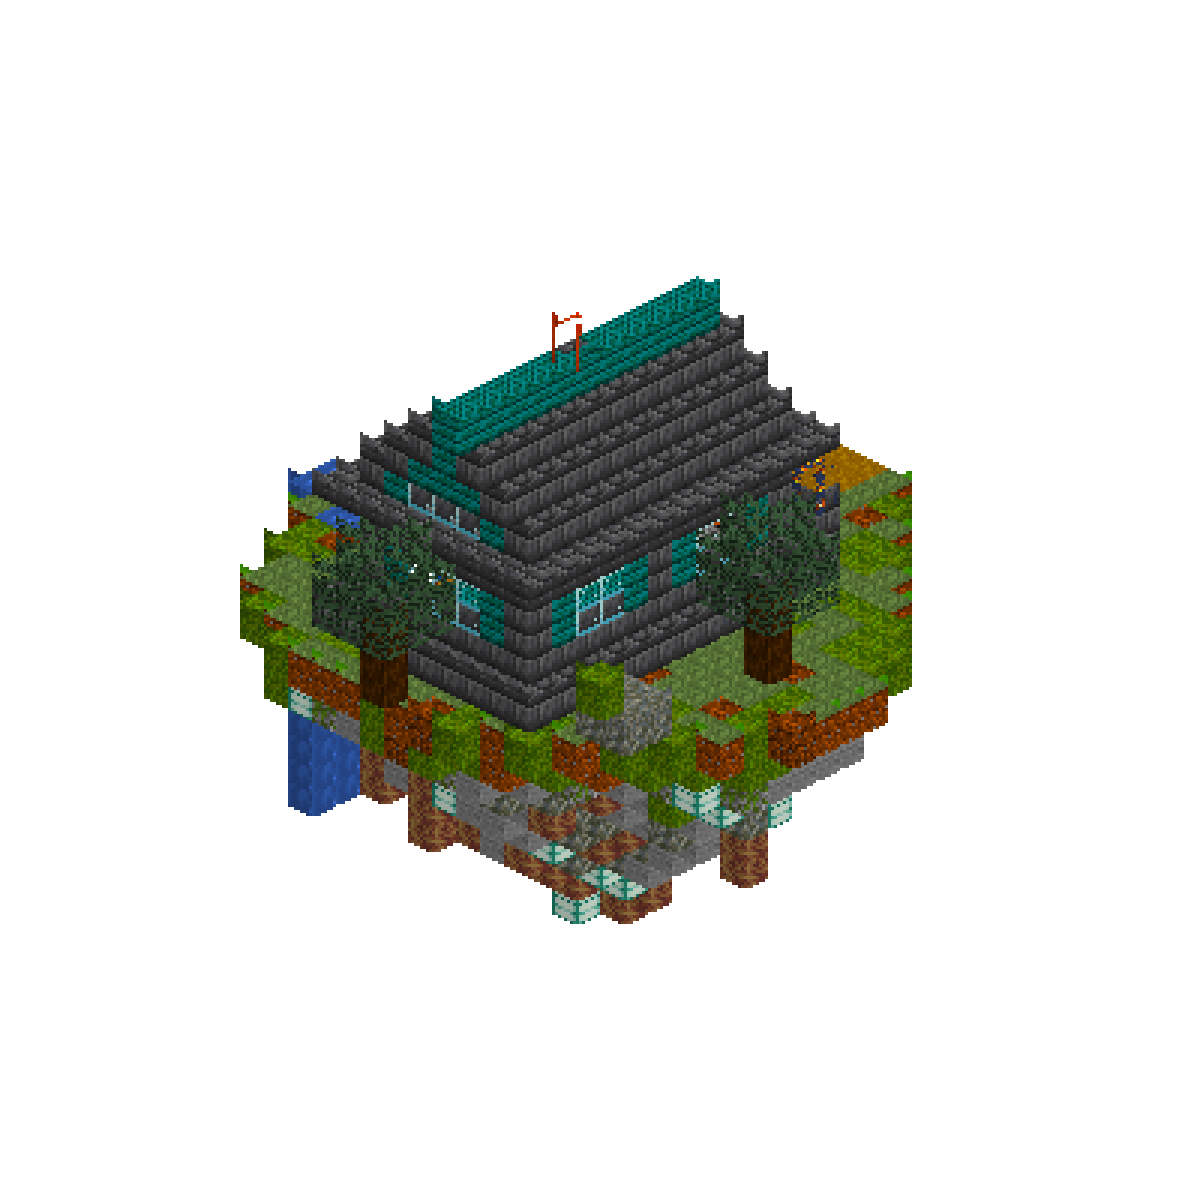
A floating island is the one build where the interesting half is underneath. The lawn on top is easy; what sells it is the rock hanging below — wide shoulders under the rim, then a long taper down to a single point, sea lantern veins glowing out of the stone, and a waterfall pouring off the edge into nothing. This one is 25 blocks across and 24 tall, hollow through the middle so it costs about 1,900 blocks rather than 3,000, and it carries a small hall in deepslate and warped planks with a glass band down both long walls. Build it over a ravine, over the sea, or at cloud height — it reads as deliberate from every angle, which is more than most sky bases manage.
What you need
| Block | Count |
|---|---|
| Stone | 358 |
| Deepslate bricks | 294 |
| Grass block | 187 |
| Dripstone block | 184 |
| Dirt | 181 |
| Tuff | 134 |
| Moss block | 119 |
| Warped planks | 89 |
| Coarse dirt | 69 |
| Water | 50 |
| Spruce leaves | 44 |
| Deepslate bricks slab | 43 |
| Sea lantern | 41 |
| Glass | 28 |
| Mossy cobblestone | 15 |
| Dirt path | 15 |
| Warped planks slab | 9 |
| Spruce log | 8 |
| Lantern | 8 |
| Bookshelf | 4 |
| Crafting table | 1 |
| Furnace | 1 |
| Lightning rod | 1 |
Counts are exact for the model above. Mine a little spare — nobody places every block first time.
Building it
Each stage names the layers it covers. Drag the slider on the model to that layer and you are looking at exactly what the stage describes.
1.Draw the lawn, not a circle
Build the top first and hang everything else off it — you can stand on a lawn, you cannot stand on an underside. Mark a rough circle about ten blocks out from centre and then walk the edge, pushing it two blocks further out here, pulling it one back there. Nothing kills a floating island faster than a rim you can read as a circle. Lay y=11 in dirt and y=12 in grass, then break the green up: about a fifth of the surface in moss blocks, the odd square of coarse dirt, and moss again along the last block of the rim where the grass rolls over the edge. Keep the middle 9 by 13 flat and clear. That is where the hall lands, and the plinth needs solid ground under every block of it.
2.Hang the shoulders
Now go under. Each course from y=10 downwards pulls in about a block, so the grass rim overhangs the rock by one the whole way round and throws a shadow line under itself — that overhang is the entire illusion. Stone with roughly a third tuff mottled through it reads as rock rather than as a grey wall; keep the tuff in loose vertical streaks instead of an even sprinkle. Directly under the rim, swap a few blocks for moss and mossy cobblestone so the green looks like it is spilling over. Build the shell three blocks thick and leave the core hollow: it saves the better part of a thousand blocks, nobody can see in, and the sealed chamber you are left with is the obvious place for a cellar later.
3.Taper it to a point
Below y=6 the island stops being a lump and becomes a spike. Pull each course in a full block, sometimes two, and shift the material over to dripstone as you drop — it is warmer and rustier than stone, so the underside darkens and reddens towards the tip, which is what torn-out ground actually does. Finish on a single block at y=0. Then break the profile: pick eight columns near the widest part of the underside and hang one to three dripstone blocks off the bottom of each as stalactites. Twelve blocks of work, and they are the difference between a smooth cone and something that looks ripped out of the earth.
4.Run the sea lantern veins
Four veins, each starting at a different quarter of the compass, climbing from near the tip up to just under the rim and rotating about a sixth of a turn per level as they go. Replace the surface block along that path with a sea lantern and skip roughly every fourth one so the line breaks up instead of reading as piping. Sea lantern rather than glowstone: the cold blue-green sits against the rust of the dripstone rather than fighting it, and it ties the rock to the warped planks in the hall above. It is practical too — a lit underside means nothing spawns on the rock, and the island still reads from a hundred blocks away at night.
5.The pond, the lip and the fall
A waterfall needs somewhere to come from or it looks stuck on. Sink a small pool into the west lawn, about five across and one deep with a two-block hollow in the middle, then cut a channel from it straight out to the rim and drop the lip block level with the grass. Water in the pool, in the channel, over the lip. From there a two-wide column of water falls down the outside of the rock from the rim to the bottom of the build. It never touches the taper, because the rock pulls inwards faster than the water falls, so the fall hangs clear in open air the whole way down and disappears into nothing. In game one bucket at the lip does most of this for you.
6.Plinth, walls and the window band
The plinth is 9 by 13 and the walls 7 by 11 — deliberately modest, because the island is the showpiece. Lay the plinth at y=13 in deepslate bricks, standing one block proud of the walls all round, and floor the middle in warped planks with two sea lanterns set flush into the aisle. Walls run y=14 to y=17: a deepslate base course, a band of warped planks at y=15-16, then deepslate again at the top as a wall plate. Cut paired two-by-two windows into the plank band on both long walls with a deepslate pier standing between them, and a three-wide window across the back. The entrance goes in the gable end — jambs either side, a three by three opening, warped plank lintel over it.
7.Eaves, gable and ridge
At y=18 lay a solid deepslate course over the whole plinth footprint. That single layer is ceiling, soffit and overhang in one, and swapping the outermost ring for deepslate brick slabs makes the eaves read thinner than the wall below — a small move that stops a roof looking glued on. The gable spans the seven-wide hall with its ridge running the long way, so it rises three levels and tops out at y=22. Fill both end triangles in warped planks so light timber sits inside a dark frame, punch a three-wide glass slot into each at y=19 and back it with sea lanterns in the attic void, then run the ridge itself in warped planks. Lightning rod on top: a building this exposed will take a strike.
8.Furnish, plant and light
Inside: bookshelves either side of the back wall, a low warped slab dais in front of them, and a three-long table down the centre on a deepslate base. Crafting table and furnace by the door, where you actually use them. Four lanterns under the ceiling at y=17, two more under the eaves outside the entrance. Out on the lawn, a dirt path from the south rim to the doorstep with a slab step up onto the plinth, a lantern on a deepslate post either side of it, two spruce trees, a low tuff crag beside the path and a couple of mossy boulders. Spruce, not oak — oak leaves are pale and vanish into the sky, spruce holds its dark green against a black roof.
Make it yours
- Build the lawn first and work downwards. Standing on ground you have already placed beats bridging out over a void, and it keeps the taper honest because you can see the rim you are pulling in from.
- The rim has to overhang the rock below by a block the whole way round. Line them up flush and the island reads as a cylinder of dirt, which is exactly what every first attempt looks like.
- Hollow the core out. A three-block shell is invisible from outside, it halves the stone bill, and the sealed chamber it leaves behind is where the trapdoor and ladder down to a storage cellar go.
- Sea lantern veins earn their keep twice: they light the underside so nothing spawns on the rock, and they stop it being a dead grey mass at night. Break the line every few blocks or it reads as plumbing.
- In survival, build it at cloud height over water. Everything you drop is recoverable, and scaffolding down from the finished lawn is far safer than pillaring up to nothing.
- Swap the warped planks for crimson if the teal is too much against the moss. Deepslate, dripstone and grass all still work, and the sea lanterns become the only cool colour left in the build.