How to build the Colosseum Arena in Minecraft
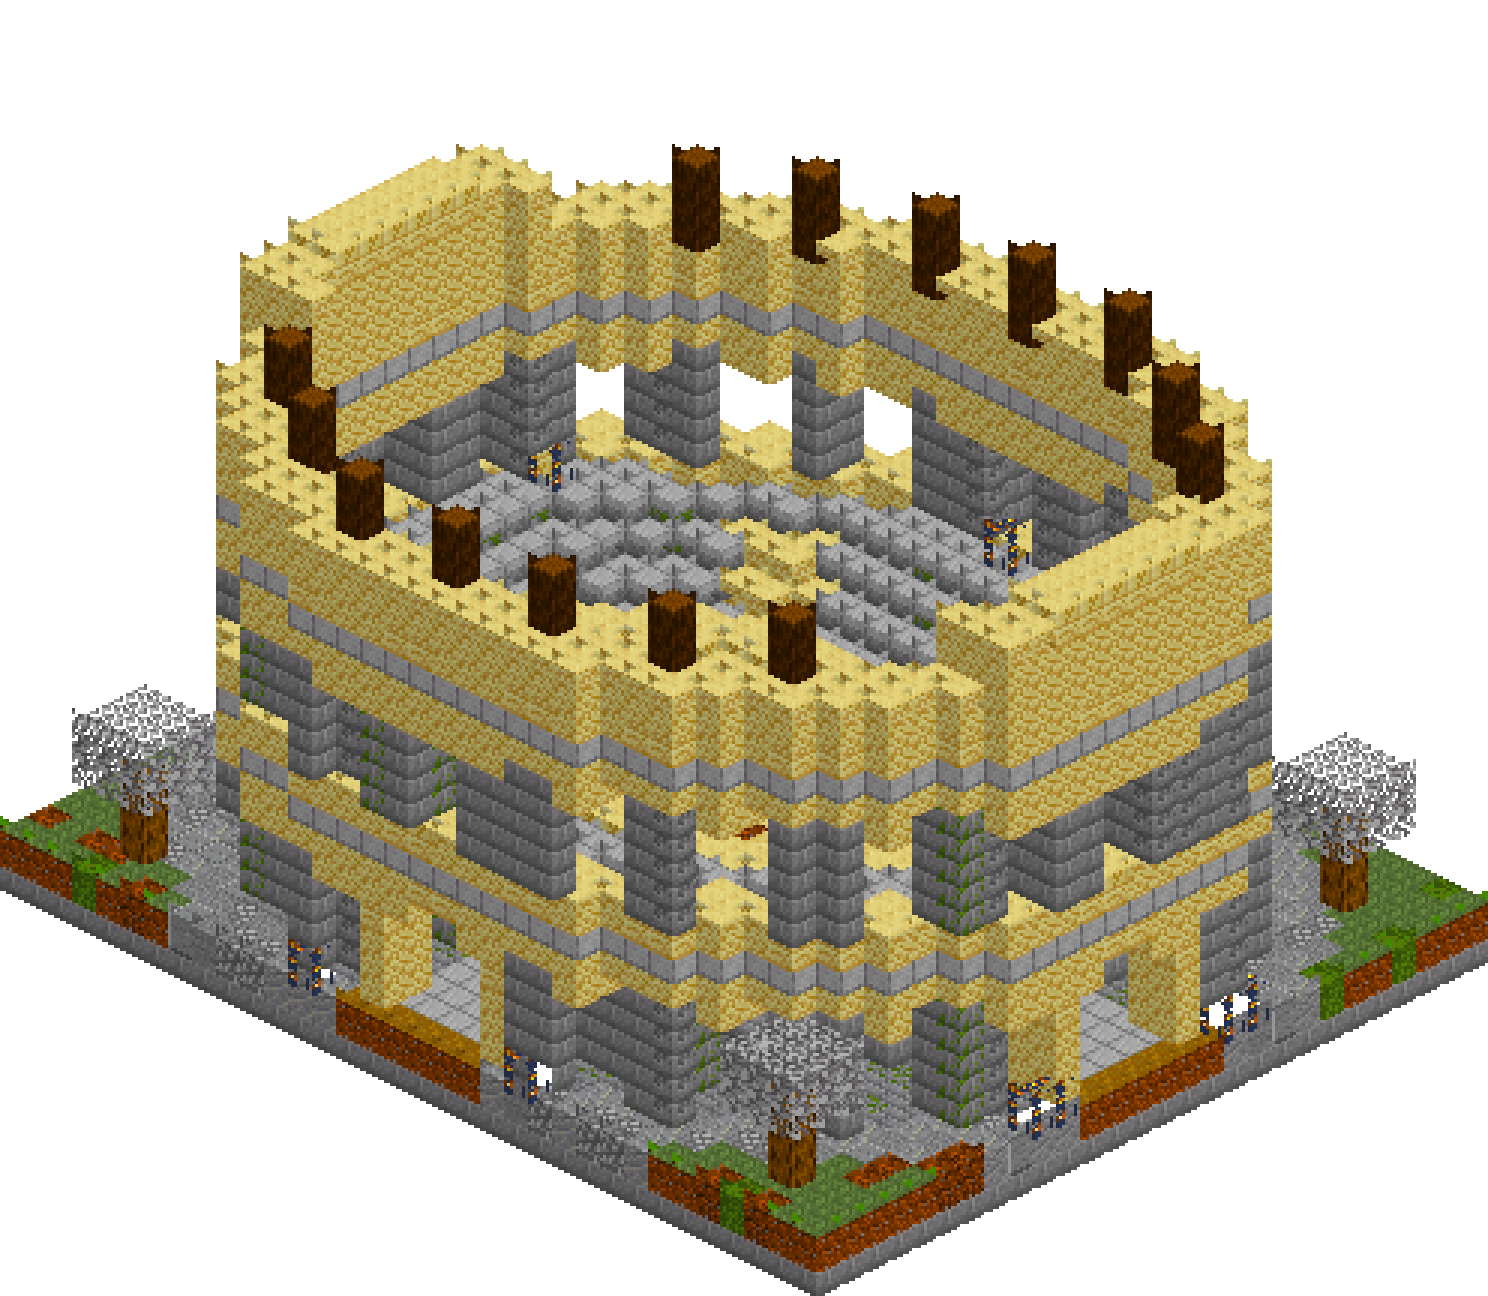
Two rings of arches, a bank of seating stepping down to sand, and a tunnel you can actually walk out of onto the arena floor. The oval is the whole trick: it is drawn as nested ellipses, one layer at a time, so every course sits where it should instead of drifting into an egg. Behind the outer wall runs a vaulted gallery the full way round, with stair aisles climbing to a promenade at the rim, and the podium is tall enough to keep whatever you spawn down there where it belongs. It reads as a sunlit ruin by day and a lantern-lit ring at night, and it is the rare showpiece that is genuinely worth standing inside.
What you need
| Block | Count |
|---|---|
| Stone bricks | 2411 |
| Sandstone | 1766 |
| Smooth stone | 456 |
| Mossy stone bricks | 306 |
| Chiselled sandstone | 260 |
| Smooth stone slab | 258 |
| Cracked stone bricks | 237 |
| Sandstone slab | 176 |
| Sand | 79 |
| Grass block | 74 |
| Oak leaves | 68 |
| Andesite | 56 |
| Spruce log | 42 |
| Lantern | 34 |
| Stone | 32 |
| Cobblestone | 29 |
| Dirt path | 24 |
| Polished andesite | 23 |
| Coarse dirt | 22 |
| Oak log | 16 |
| Moss block | 10 |
| Gravel | 7 |
Counts are exact for the model above. Mine a little spare — nobody places every block first time.
Building it
Each stage names the layers it covers. Drag the slider on the model to that layer and you are looking at exactly what the stage describes.
1.Plinth, oval plan and the ground
One box of stone brick covers the whole footprint at y=0 as a plinth, then a single layer at y=1 carries the entire plan: the oval mass, the sand arena with its chiselled medallion, and everything outside the ellipse. That outside matter is not decoration. Paving of andesite, stone and cobblestone hugs the wall, grass and moss take the four corners the oval cannot reach, and dirt-path roads run out on both axes to meet the gates. Get the ground right here and every layer above is just a trace of this one.
2.Podium, cavea and the vaulted gallery
The seating is a solid mound, banked in three rows: each row is aged stone brick topped with a smooth stone slab, so a row rises a clean block while the half-block lip catches the light. Radial aisles are swapped to sandstone, which stripes the bank without changing its shape. Inside the ring, the two courses nearest the wall are hollowed from y=2 to y=6 into a gallery with brick pilasters holding the vault at y=7. The podium ring is two blocks thick, sandstone to y=5 and capped in chiselled sandstone, standing five blocks above the sand.
3.Ground arcade and the two tunnels
The outer wall is two blocks thick and cut into twenty even bays. Piers stay aged stone brick; openings run four tall with a sandstone arch head and a one-block keystone notch, which is what makes them read as arches rather than square holes. On the long axis a four-wide, four-tall tunnel drives straight through wall, gallery, cavea and podium onto the sand. Two smaller gates on the short axis stop at the gallery. Every gate gets sandstone jambs, chiselled sandstone caps and a chiselled keystone at y=7.
4.Cornice, promenade and upper arcade
A full course of smooth stone at y=8 bands the whole ring and stops the sandstone reading as one flat mass. At y=9 the piers turn chiselled while the gallery roof becomes a slab promenade, an unbroken walkway at the top of the cavea. Above it sits the second arcade, openings from y=10 to y=13 and a crown course at 14, with a deliberate window centred over each of the four gates so the axes line up top to bottom. A sandstone spandrel at 15 closes the storey.
5.Attic, coping, masts and gate fronts
Repeat the cornice trick: smooth stone at y=16, chiselled pilasters at 17, plain sandstone at 18, then a sandstone slab coping at 19 so the rim finishes on a half block rather than a blunt edge. Fourteen spruce logs stand three tall on the coping as awning masts, and the two ends of the long axis carry the wall up solid to y=21 with a chiselled cap, giving the main gates a raised frontispiece. Without those two moves the silhouette is a flat drum.
6.Lanterns, ageing and the approach
Thirty-two lanterns do the work: hung under the vault in the gallery, hanging in both tunnels, standing on the rim promenade, and flanking the four approach roads out on the plaza. Mossy and cracked stone brick are mixed through every brick surface at roughly a quarter, which ages the whole thing for free. Four oaks sit on the corner lawns the oval leaves behind, so the building has something growing against it instead of standing on bare ground.
Make it yours
- Draw the oval once at y=1 and trace it upward. Free-hand each course instead and the ends of the long axis go pointy, which nothing you build above will disguise.
- Piers in aged stone brick against arch heads in sandstone: that two-material split is what makes an arcade read as arches rather than as holes punched in a wall.
- Give every seat row a slab on top of its full block. The half-block lip catches light, stripes the bank, and the rows still step a clean block apart so you can walk down.
- A gallery is only worth hollowing if you can get out of it. Keep the stair aisles hugging the outer wall so the promenade above stays an unbroken ring.
- The masts cost one spruce log each and they are the only thing breaking the skyline. Leave them off and the whole ring reads as a low drum.