How to build the Copper Clocktower in Minecraft
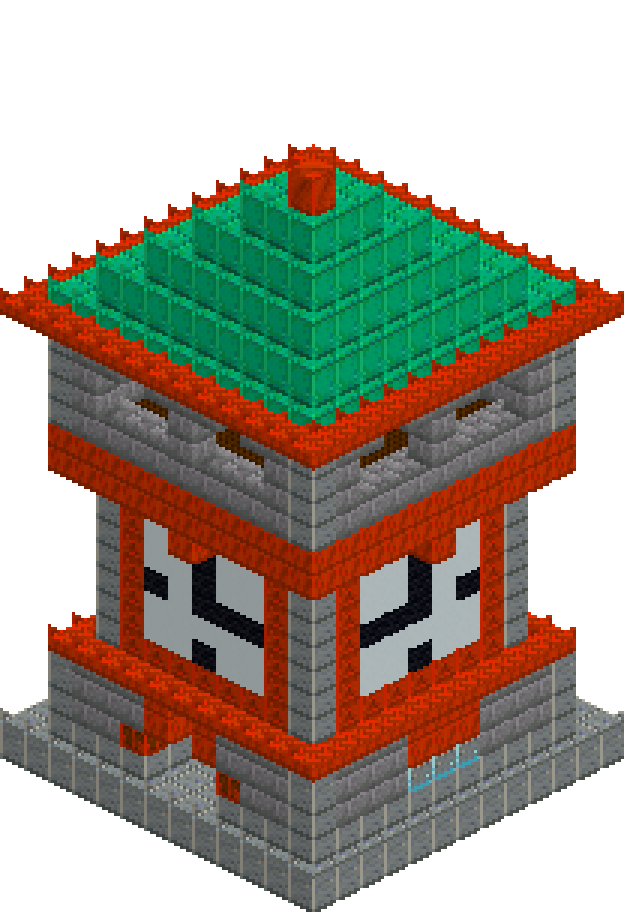
Twenty-four blocks of stone brick, copper and dark oak that give a village or a spawn town something to navigate by. The base is a thick battered plinth, the shaft narrows above it and carries a seven-by-seven clock plate on all four sides, then the whole belfry jetties back out over the shaft on a two-course copper band. The spire is oxidised copper, stepped to a real point rather than a blunt stump, and the arcade glows after dark from copper bulbs tucked behind the corner piers. No redstone anywhere — it is all placement, order of operations and patience.
What you need
| Block | Count |
|---|---|
| Oxidized copper | 285 |
| Stone bricks | 260 |
| Polished andesite | 242 |
| Cut copper | 174 |
| Dark oak planks | 125 |
| Chiselled copper | 96 |
| Cut copper slab | 88 |
| White concrete | 72 |
| Black wool | 28 |
| Glass | 18 |
| Copper bulb | 10 |
| Copper block | 2 |
Counts are exact for the model above. Mine a little spare — nobody places every block first time.
Building it
Each stage names the layers it covers. Drag the slider on the model to that layer and you are looking at exactly what the stage describes.
1.Footing and battered plinth
Lay the thirteen-by-thirteen polished andesite pad first. It is the step the tower stands on and it stops the walls meeting the ground in a hard line, which is what makes small towers look dropped in rather than built. The plinth above is eleven wide and two blocks thick, so the interior settles at seven by seven and holds that width the whole way up. Drop a polished andesite base course at y=1 and run andesite piers up all four corners — that alone kills the flat stone-brick-slab look. Cut the door three wide through both wall courses on the south face, then put cut copper back at x=5 and x=7 on the top row so it springs into a proper arch. Glaze the other three faces with a three-wide slit at y=2, lintel each one in copper, and set a copper bulb either side of the door.
2.The shaft steps in
Ring the top of the plinth with cut copper slabs at y=4. They sit half a block proud of the shaft above and throw a shadow line exactly where the wall steps in, which is the whole reason the change of width reads as intent instead of as a mistake. The shaft itself is nine by nine and eight courses tall, hollowed to a seven-by-seven interior. Run polished andesite up all four corners as quoins — the same trick as the plinth, and it ties the two storeys together vertically. Lay a dark oak floor at y=6 with a two-by-two hatch in the north-west corner and put a ladder through it; that floor is what turns the clock chamber into a room rather than the top of a well. Two copper bulbs low and two high, in opposite corners, so neither storey goes dark.
3.Four clock faces
Each face gets a seven-by-seven chiselled copper plate set flush into the wall from y=5 to y=11, stopping short of the quoins so the corners stay clean. Inside it, a five-by-five field of white concrete. Then the hands: one black wool run from the centre block up to the twelve, one from the centre out to the three, and single markers at six and nine. Odd numbers matter here — a five-wide field has one true centre block, and every hand and marker has to grow from it or the face goes cross-eyed. Copper against white reads at range far better than a stone surround, which is why the bezel is metal and not brick. Build all four the same; a clocktower with one face is a folly with an excuse.
4.The copper jetty
Two solid courses of cut copper at y=12 and y=13, eleven wide, so the belfry oversails the shaft by a block on every side. Before laying them, set a single cut copper bracket at y=11 in the middle of each face, tucked against the top of the clock plate, so the overhang has something visibly carrying it. Cap the inside of the band with dark oak at y=13 for the belfry floor, then cut a two-by-two hatch straight down through both copper courses in the same corner as the hatch below, so one ladder run serves the whole tower. The jetty is the single move that turns a tapering column into a tower with a head on it — skip it and the belfry just looks like more shaft.
5.The arcaded belfry
Walls eleven wide, one thick, four courses. Leave y=14 solid all the way round as a sill; it stops the belfry reading as a floating hat and gives the arches something to stand on. Polished andesite up the four corners again. For the arcade, clear seven wide and two tall from y=15 on each face, then take out one single block at y=17 above the centre of each opening. The blocks you did not carve at y=17 become the arch heads — carving down to an arch is far cleaner than trying to build one upward. Put a one-block stone mullion back between the two openings. A dark oak beam across at y=17 with a copper block hung beneath it is the bell, and four copper bulbs in the interior corners push light out through every arch after dark without a lamp being visible from the ground.
6.Eaves and the oxidised spire
The roof course at y=18 is oxidised copper, eleven wide, and it doubles as the belfry ceiling. Ring it with cut copper slabs at thirteen wide — a half-block eave that overhangs the arcade and puts a hard shadow across the openings. Then draw the roof in one block on each side per course: nine at y=19, seven at y=20, five at y=21, three at y=22, and a single bright copper block finial at y=23. That sequence is not negotiable if you want a point rather than a stump — an eleven-wide base needs exactly six courses to close, so if you ever stretch the tower, add courses to the shaft and never to the spire. Leave the spire unwaxed and let it green on its own; the contrast between a verdigris roof and bright copper trim is the entire colour scheme.
Make it yours
- Wax the cut copper trim, the chiselled copper clock plates and the finial, but leave the spire bare. The contrast between bright metal detail and a green roof is the whole palette, and unwaxed trim erases it within a few in-game days.
- Build arch heads by carving down, never up: cut the full rectangle first, then remove one block at the apex row and leave its neighbours in place. Carving upward means guessing at the curve and re-doing it four times.
- The hands only work because the white field is five wide and therefore has one true centre block. If you scale a face up, keep it odd — a six-wide face has no centre and the hands will never sit right.
- One ladder runs the full height through the two aligned two-by-two hatches at x=3-4, z=3-4. It is the only vertical circulation in the tower, so cut both hatches in the same corner before you floor over them.
- On a hillside, extend the andesite pad outward as a two- or three-step podium rather than sinking the plinth into the slope. A clocktower should look planted on the ground, not growing out of it.
- The four copper bulbs at y=16 sit inside the belfry corners, so the arcade glows at night but the light source is never visible from outside — the same trick works behind the clock plates if you want the faces to read after dusk.