How to build the Stone Watchtower in Minecraft
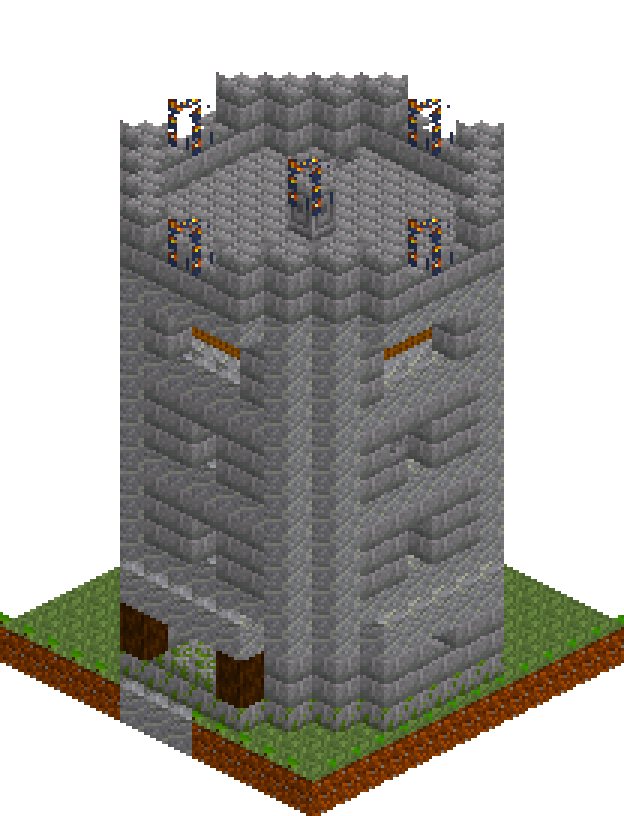
A watchtower earns its keep by being seen from a long way off, so this one is drawn as an octagon rather than a square — eleven blocks across at the plinth, nine up the shaft, eleven again at the crown. That gives a round silhouette from every angle without a single stair block. Stone bricks carry the walls, andesite does every piece of trim, and spruce floors show through the openings so the tower reads as four occupied storeys instead of a hollow chimney. The top corbels outward onto eight buttress ribs, then breaks into battlements with lanterns standing in the crenels.
What you need
| Block | Count |
|---|---|
| Stone bricks | 367 |
| Andesite | 348 |
| Spruce planks | 177 |
| Grass block | 69 |
| Mossy stone bricks | 52 |
| Lantern | 9 |
| Spruce log | 4 |
| Cracked stone bricks | 3 |
| Chiselled stone bricks | 1 |
Counts are exact for the model above. Mine a little spare — nobody places every block first time.
Building it
Each stage names the layers it covers. Drag the slider on the model to that layer and you are looking at exactly what the stage describes.
1.Footing and doorstep
Lay a 13x13 grass pad and stamp the footprint into it in andesite: rows of 5, 7, 9, 11, 11, 11, 11, 11, 9, 7 and 5 blocks reading front to back. That width sequence is the entire tower — learn it once and every ring above follows from it. Andesite rather than the stone brick that comes next, because a footing made of the same block as the wall simply disappears; a slightly different grey makes the tower look set on something rather than growing out of the lawn. Three blocks of andesite outside the south face give the door a threshold to land on.
2.The battered plinth
Raise the full eleven-wide octagon solid from y=1 to y=4, then carve the room out of it. The walls come out two blocks thick, and that thickness is what makes the doorway feel like a tunnel through masonry instead of a hole in a fence. Course y=1 in mossy stone bricks for damp at the ground and cap y=4 in andesite so the step-in above has a crisp line to sit on. Cut the door three wide and two tall through both wall blocks on the south face, frame it with spruce logs and let the andesite cap run unbroken over the top as the lintel. Three single-block vents at y=3 push a little light into the store room. Floor it in spruce at y=1.
3.Shaft, string courses and spruce floors
The shaft steps in one block all round: nine wide, rows of 5, 7, 9, 9, 9, 9, 9, 7, 5, run solid from y=5 to y=16 and then hollowed out to a seven-wide room. Before hollowing, overwrite the whole ring at y=5, y=9 and y=13 in andesite. Those three string courses are the floor lines read from outside, and they are what stops twelve blocks of stone brick turning into wallpaper. Spruce planks go back over the interior at exactly those heights, giving three clear blocks of headroom per storey. Ground floor, two chambers and a lookout: four floors, every one of them legible from the ground once the windows are in.
4.Corner ribs that break the flat
Eight single-block ribs of andesite climb the full shaft, paired either side of each diagonal face — at x3/z2 and x2/z3 on the north-west corner, mirrored on the other three. They stand on the plinth below and die into the overhang above, so they are doing an honest structural job rather than being stuck on as decoration. They also project one block proud of the wall, and that single block of shadow running the whole height is the difference between a tower and a cylinder of texture.
5.Arrow slits and the lookout band
Slits go on the flat faces, never on the ribs: one block wide, two tall, at y=6-7 and y=10-11, sitting directly on a string course so each one reads as a window with a sill. The top storey gets its whole band opened instead — three wide and two tall at y=14-15 on all four faces — because a lookout that cannot see is just a shape. Step back and check the spruce floor at y=13 shows through those openings. That glimpse of a warm timber floor inside cold stone is what sells the tower as occupied rather than abandoned.
6.Ladder shaft and lanterns
Punch a single block out of each floor at x=4, z=3 — the same column the whole way up, four hatches, one ladder run against the north wall. Keeping the hole clear of every window matters: put it under an opening and the ladder ends up hanging in mid-air. Set a lantern on each floor in a different corner rather than dead centre, so the light spills unevenly through the slits at night. Four small lights at four different heights, glimpsed through narrow openings, do more for a tower after dark than any amount of glowstone.
7.The corbelled deck
The deck is the eleven-wide octagon again, laid flat at y=17 — a full block of overhang all round, landing exactly on the eight ribs so the widening has something to stand on. Run the projecting rim in andesite and the walking surface inside it in stone brick, so from below you read a dark band of machicolation under a lighter floor. Do not forget the fourth hatch at x=4, z=3, or the lookout has no way onto the roof.
8.Battlements and the lantern crown
Two hand-drawn layers finish the job. At y=18 lay the parapet on the rim only — a one-block-thick ring, with a chiselled stone brick at dead centre as a brazier base. At y=19 alternate merlons and gaps, keeping solid blocks on the corners so the octagonal outline survives, and drop a lantern into the crenel at the middle of each of the four faces plus one on the brazier. Five lights, all of them at the top: from a hundred blocks away the tower reads as a crown of fire, which is precisely the point of building one.
Make it yours
- Swap the andesite trim for deepslate bricks if the tower stands on a mountain or in a dark biome — grey on grey stops reading the moment there is stone behind it.
- The width sequence 5-7-9-11-11-11-11-11-9-7-5 is the only thing worth memorising; every ring in the build is that list or the nine-wide version of it.
- A single glass block in each top-storey opening keeps the lookout mob-free without hiding the spruce floor behind it — glaze the openings, not the whole band.
- Sink the plinth one block into the terrain and bank a little coarse dirt against the south face; a tower that starts exactly at grass level always looks dropped in.
- If four storeys is more tower than the site wants, delete the y=9 floor and its string course and run a double-height hall — the shaft, ribs and crown all still work.