How to build the Floating Monoliths in Minecraft
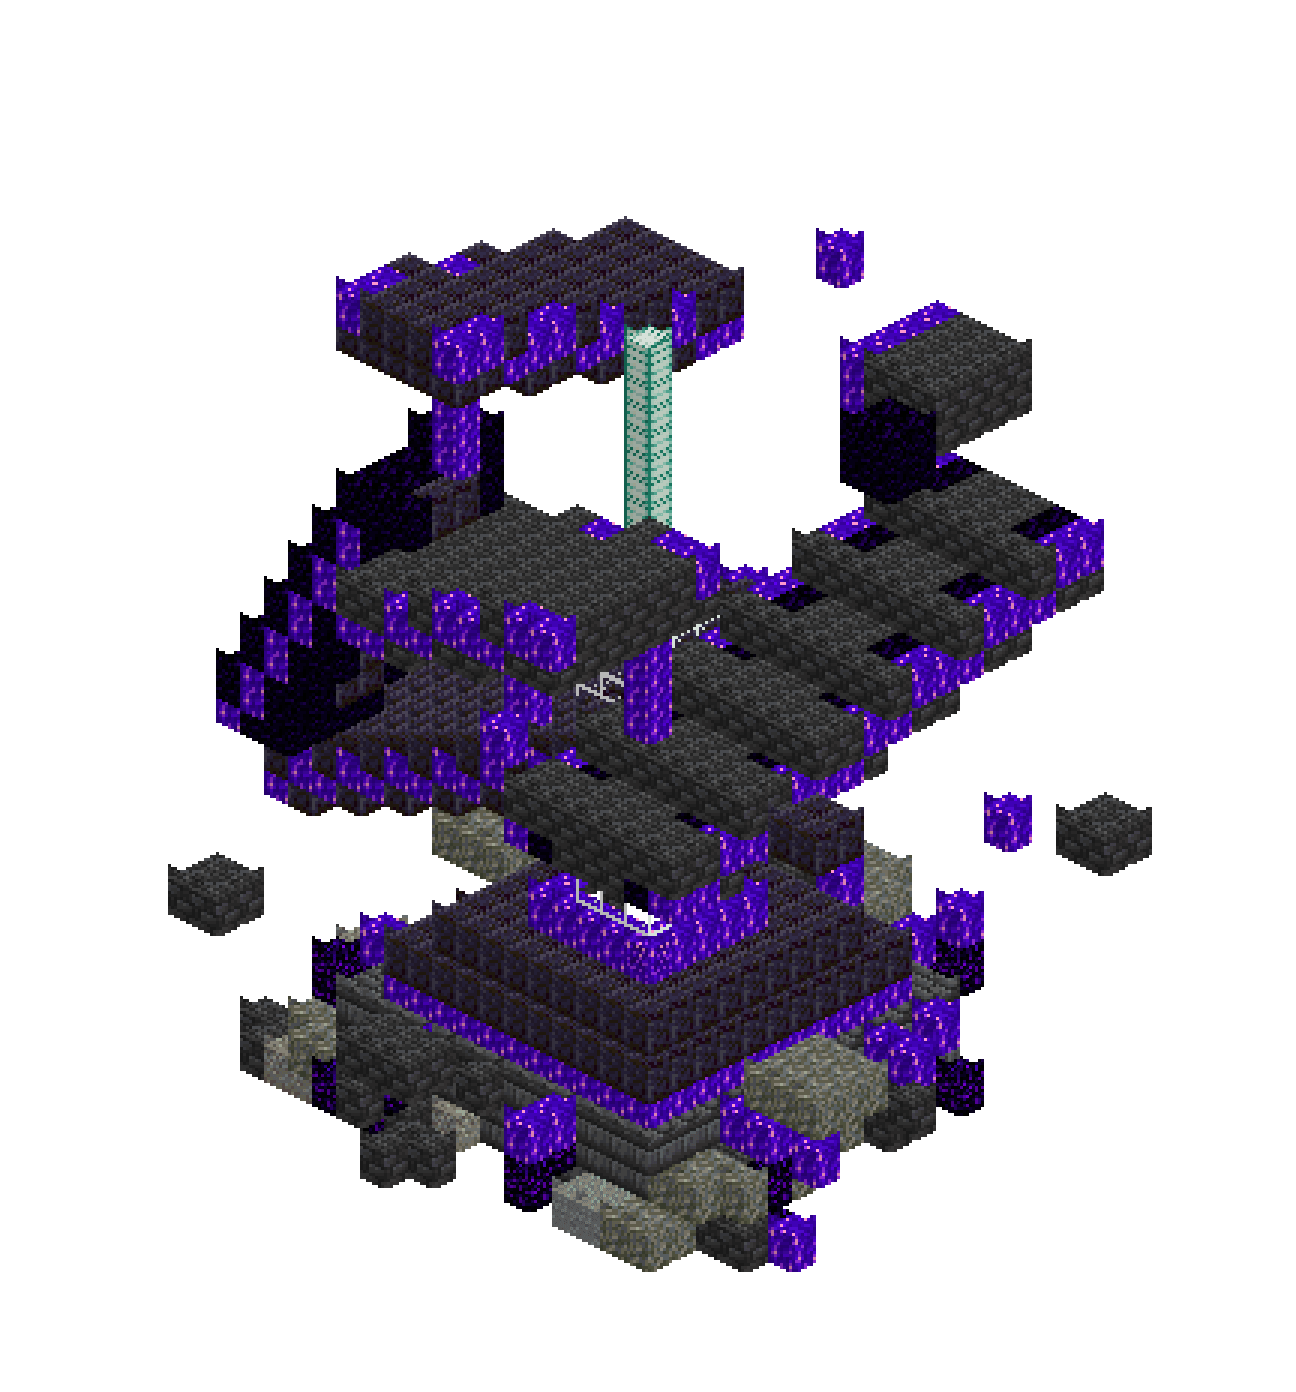
Six dark slabs hang at angles above a cracked stone dais, held apart by nothing, threaded by a single shaft of light that punches clean through the largest of them. Amethyst runs along every leading edge and strings the gaps between the slabs, so the negative space glows as hard as the stone does. It is built almost entirely from stepped boxes — two of rise, two of run, repeated — which is why a shape this dramatic stays this easy to lay out. Nothing touches the ground except the plinth, and the ground itself is in pieces.
What you need
| Block | Count |
|---|---|
| Polished blackstone | 670 |
| Deepslate bricks | 507 |
| Deepslate tiles | 365 |
| Amethyst block | 238 |
| Obsidian | 176 |
| White stained glass | 120 |
| Polished blackstone slab | 73 |
| Tuff | 56 |
| Crying obsidian | 40 |
| Calcite | 25 |
| Sea lantern | 24 |
| Gravel | 13 |
| Stone | 13 |
| Blackstone | 2 |
| Budding amethyst | 2 |
Counts are exact for the model above. Mine a little spare — nobody places every block first time.
Building it
Each stage names the layers it covers. Drag the slider on the model to that layer and you are looking at exactly what the stage describes.
1.The shattered floor
Lay the floor as one layer op rather than as a disc. Work out from the plinth's 13x13 footprint to a ragged rim about eleven blocks from centre, mixing tuff, stone, gravel and deepslate tiles in two-by-two patches so it reads as broken rock instead of static. Then bite chunks out of the outer three rings — whole 2x2 pieces, never single blocks — and run eight fractures of crying obsidian outward from beneath the plinth. The second and third courses are almost empty: only the fissure walls standing proud, tipped with amethyst where they crack open.
2.The plinth and its socket
A stepped dais, thirteen across at the base and narrowing twice. Two courses of deepslate bricks at y1-2, then step in one block for two courses of polished blackstone at y3-4, and ring that step with amethyst — a single line along each of the four sides is enough, and it is the only horizontal glow in the whole build. Cap it at y5 with a 9x9 blackstone top and a 5x5 calcite inlay, then one course higher lay a raised 5x5 amethyst socket. The beam grows out of that socket, so leave its centre alone for now.
3.The great slab
The largest monolith is a stack of seven boxes, each two blocks wide, two thick and thirteen deep, and each one course higher and two blocks further along x than the last. That is a rise of seven over a run of fourteen — roughly 27 degrees, steep enough to read as fallen rather than parked. Run obsidian along the second course in from each long face for a dark underbelly, then sit a polished blackstone slab on every riser: six half-blocks turn a staircase into a ramp. Finish with an amethyst line traced diagonally along both long edges, following the tilt exactly.
4.The shard and the long slab
Two monoliths at once, because between them they set the silhouette. The shard on the -x side climbs almost vertically — six obsidian boxes three wide and four deep, each two courses up and one block along, from y12 to y23. Its two inner faces get polished blackstone so the shard is not one flat colour. The long slab on the +x side runs the other axis entirely: seven wide, three deep, dropping one course every three blocks of z as it falls from y21 at the back to y15 at the front. Amethyst on the outer face of each, obsidian one block in.
5.The high slabs and outriders
Three smaller masses, all above y21, none of them centred. The high slab crosses the -x side in four steps from y24 to y28; the cap slab sits over +z in three steps of deepslate tiles; the outrider is a single 4x2x4 chunk hung out on its own at the back to stop that corner of the sky going empty. Scatter six or seven loose fragments — two blocks, sometimes one — through the air between everything, and drop a lone amethyst block into a few of them. The debris is what stops the gaps looking like mistakes.
6.The beam and the amethyst seams
Last, and only last, drive the beam. A 3x3 column of white stained glass with a sea lantern core rises from the amethyst socket at y6 up to y20, then narrows to a single lantern block all the way to y29. Because it goes in after the monoliths it punches a clean square hole through the great slab, which is exactly the read you want. Then string the seams: short amethyst runs bridging one slab's top face to the next slab's underside — four of them, each in a different gap, each a different length, so they never look like columns.
Make it yours
- Amethyst block gives off no light of its own — bury a sea lantern or a glowstone one block behind each seam, or the purple goes grey and dead the moment the sun drops.
- Build every slab off a temporary dirt column under its near corner and mine the columns out from the top down; placing a tilted slab from below wastes an hour and half your stock.
- One polished blackstone slab on each riser is the whole trick — half a block turns a staircase into a ramp. Do the top face only and leave the underside stepped; nobody sees it and it saves a hundred blocks.
- Keep at least three blocks of air between any two monoliths. Two reads as a crack in one object; three or more reads as two objects genuinely levitating.
- Break the floor in 2x2 bites rather than single blocks, and let the crying obsidian fractures run out past the last of the rubble so the cracks look like they carry on beyond the build.