How to build the Harbour and Warehouse in Minecraft
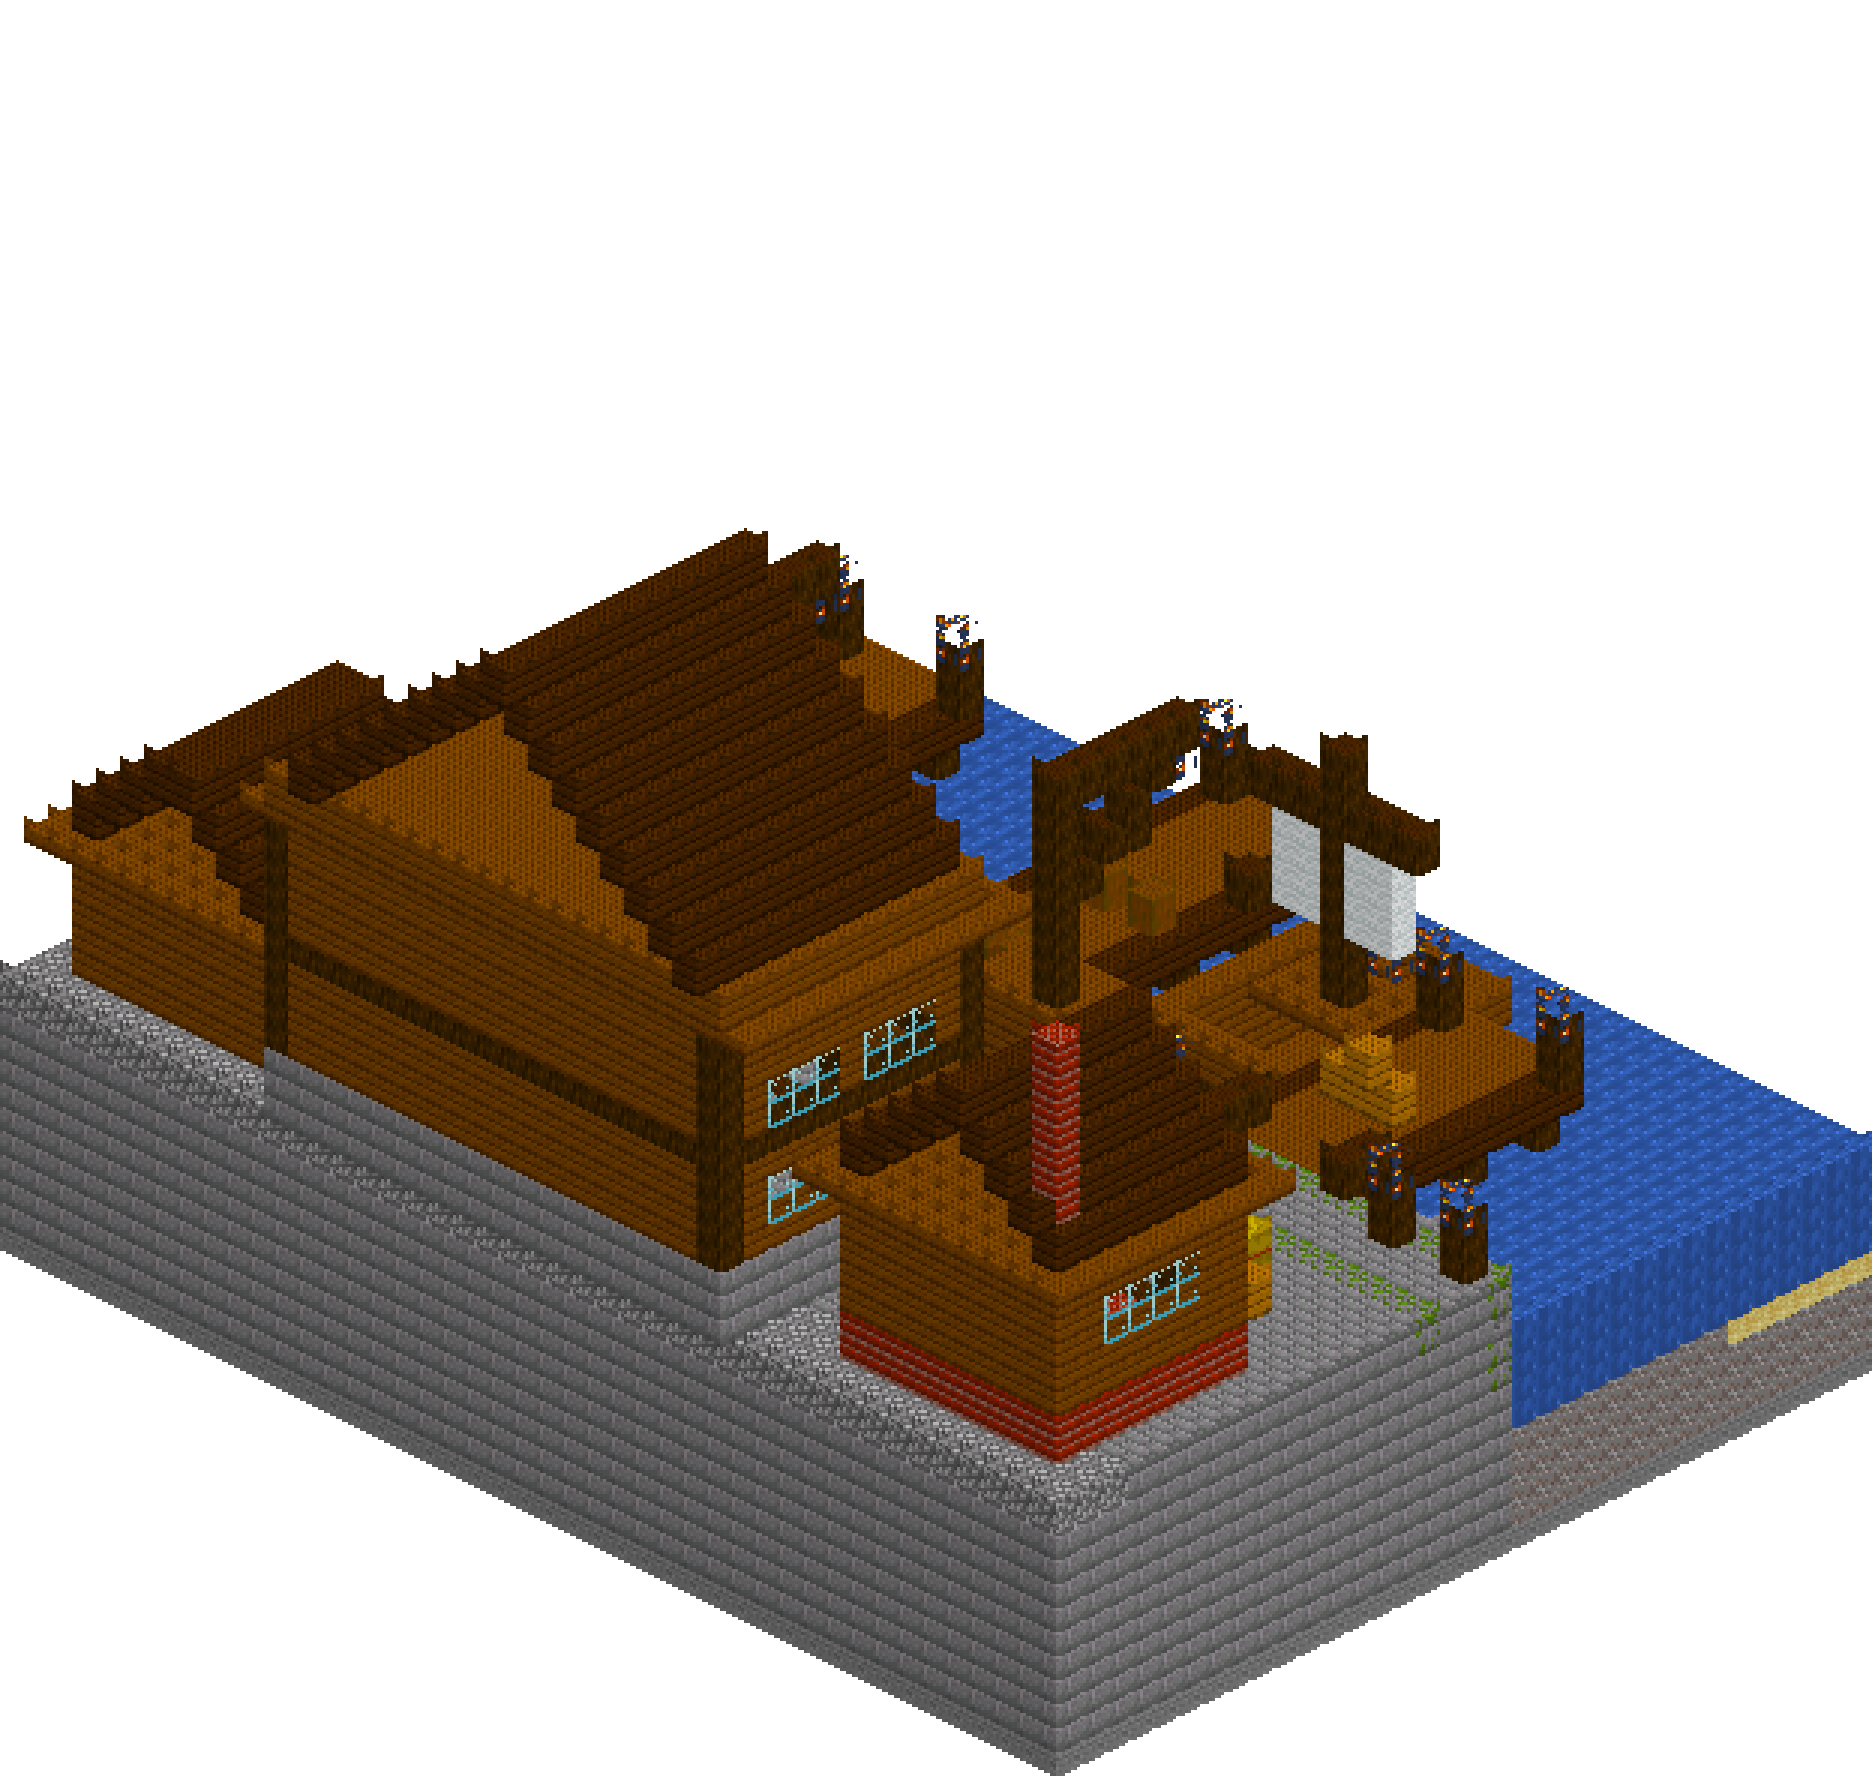
Most waterfronts are a plank rectangle floating on the sea. This one is a working harbour: a buttressed stone quay wall holding back made ground, three timber jetties standing on driven piles, a derrick swung out over open water, and a warehouse tall enough that its hoist beam clears a barge's yard. The warehouse carries the whole silhouette — nineteen across, a stone plinth, a spruce body ringed with a timber band, a dark gable with cart doors, a loading door and a hoist door stacked on one centreline so you can read how cargo travelled. Everything else steps down from it, so the ridge always wins.
What you need
| Block | Count |
|---|---|
| Stone bricks | 4210 |
| Dirt | 4116 |
| Gravel | 2376 |
| Water | 2296 |
| Stone | 1496 |
| Spruce planks | 1094 |
| Spruce planks slab | 592 |
| Dark oak log | 424 |
| Dark oak planks | 398 |
| Sand | 264 |
| Mossy stone bricks | 192 |
| Cobblestone | 132 |
| Bricks | 107 |
| Glass | 80 |
| Cracked stone bricks | 44 |
| Oak planks | 24 |
| Lantern | 21 |
| Stripped spruce log | 20 |
| Stone bricks slab | 17 |
| White wool | 16 |
| Hay block | 6 |
| Sea lantern | 3 |
Counts are exact for the model above. Mine a little spare — nobody places every block first time.
Building it
Each stage names the layers it covers. Drag the slider on the model to that layer and you are looking at exactly what the stage describes.
1.Basin, seabed and made ground
Lay a stone pan across the whole footprint at y0 so nothing floats later. Gravel fills y1 to y4 across the water half (z0 to z14) with a skim of sand along the far edge — two materials underwater read as a real bottom rather than a texture. Behind the quay line, z18 to z33 is made ground: dirt for the bulk, then wrap it in a hollow stone brick shell so the cut sides and back face show masonry, not a dirt cliff. Water goes in last, y5 to y8, so its surface sits two blocks below the deck. That two-block freeboard is the whole reason the quay looks like a quay.
2.The quay wall and its buttresses
The wall is one solid mass of stone bricks, z15 to z17, from the seabed to y9 — three blocks thick because it is holding back everything you just filled. Band it: mossy stone bricks at y7 and y8 where the water works at it, cracked stone bricks along y9 as the top course. Then push buttresses out into the water at z14 in pairs at x0-1, x13-14, x25-26 and x39-40, running the full height and capped with a slab at deck level. A flat wall forty-four blocks long is dead; four projections and a shadow line fix it for almost nothing.
3.Piles and the jetty decks
Drive dark oak logs from y5 to y9 in pairs at the outer edges of each jetty, every third block along its length — that spacing is what makes the piles read as piles rather than a wall. Three jetties, deliberately unequal: the short one at x3-8, the long one at x17-22 running out to the edge of the world, the third at x31-36. Deck them at y10, level with the quay, spruce planks with a dark oak border so each jetty has an edge line. Tuck a sea lantern or two on the seabed under the timbers; the glow through water under a jetty is worth the three blocks it costs.
4.The warehouse shell
Set the footprint x11-29 by z23-33 and give it a stone brick plinth y11 to y13 — cart-bed height, so the floor sits a block above the apron and goods roll straight off. Spruce planks take it from y14 to y22, then hollow the inside out in one clear so you are left with a shell and a stone floor. Ring it with a dark oak band at y18 and stand log posts at all four corners: that band plus the corners is what stops nineteen blocks of plank reading as a fence. Long glass strips at y19-20 down both flanks, split by a plank mullion, keep the window rhythm without twenty separate ops.
5.Roof, gable and hoist
A course of spruce slabs at y23 overhangs the walls by one on three sides — eaves, and a loft floor in the same move. The gable rises from y24 in dark oak, nineteen across, nine levels to a ridge at y33; swap its bottom course back to spruce planks so the roof has a visible edge instead of dissolving into the wall. Now cut the doors in a vertical stack: cart doors at y11-16, a loading door at y19-21, a hoist door at y26-28 under the peak, each framed in dark oak logs before it is cleared. The beam is a log at y31 projecting three blocks clear of the wall with a lantern swinging under its tip.
6.Counting house, shed and crane
Three lesser masses keep the warehouse dominant. East, at x33-41, a brick-plinthed counting house with a four-level gable and a brick chimney driven up through the roof to y26 — the chimney is the silhouette, not the building. West, at x1-8, a low net shed with a three-level gable and a wide door. On the quay itself, a winch house at x24-28 and a derrick: a log mast to y23, a jib thrown six blocks out over open water, one diagonal brace, one lantern at the hook. Nothing here is taller than the warehouse eaves except the mast, which is exactly the point.
7.The moored barge
In the gap between the middle and far jetties, a hull: a hollow spruce box from y6 to y9, cleared inside so the hold is open space, with slab decking over the forward half. Its gunwale sits one block above the waterline and one below the quay, which is what makes the quay look high. A yard log at y17, a white wool sail hung beneath it, then run the mast up last so it reads in front of the canvas rather than behind it. A lantern on the fore deck gives the harbour a second light source out on the water.
8.Cargo, bollards and lamps
The last three layers are what sell it as working. Bollards — single logs — at the jetty heads and along the quay edge. Lamp posts two logs high with a lantern on top, spaced along z15 and either side of the cart doors. Then cargo in stacks that step down: oak plank crates three wide and two high, stripped spruce barrels in loose clusters, hay bales as sacks by the counting house. Vary the heights and never centre a stack — cargo lands where it is dropped. Finish with a slab step at the cart doors and lanterns on the canopy posts.
Make it yours
- Get the freeboard right before anything else: water surface at y8, deck at y10. If the deck sits on the water the quay wall stops reading as masonry holding back a hill.
- Frame every opening in dark oak logs first, then clear the hole inside the frame. Placing the frame after the cut always leaves you patching single blocks.
- The three doors on the gable end must share a centreline — cart doors, loading door, hoist door, all stacked on x19. That vertical line is what tells the eye how cargo moved.
- Space jetty piles every third block, not every block. A continuous row of logs reads as a sea wall; gaps read as timber standing in water.
- Keep the crane mast, the barge mast and the office chimney all below the warehouse ridge. Three secondary verticals at different heights beat one big roof and a flat skyline.