How to build the Kraken Wreck in Minecraft
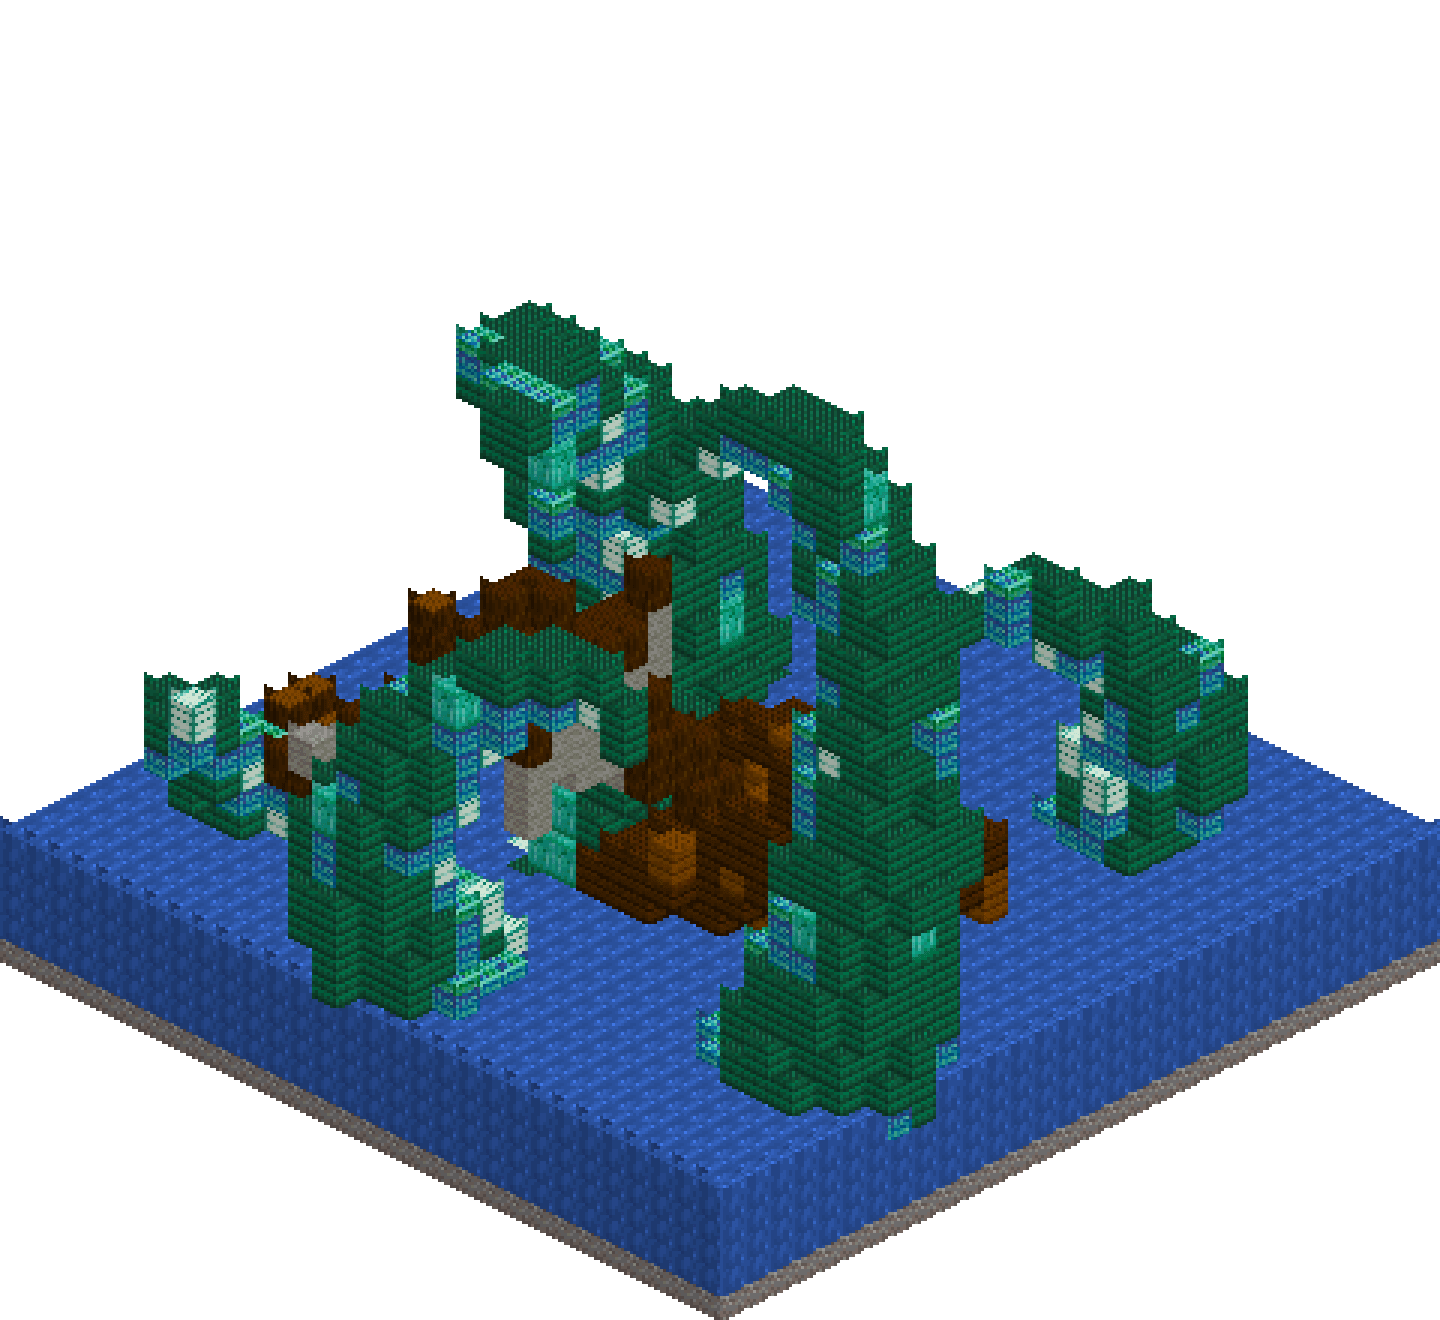
A kraken has a ship by the waist and is not letting go. Six arms of dark prismarine break the surface around a galleon that has already lost its stern, the hull pitched bow-up and rolled to port while the ribs of the torn-away half still stand in the shallows like a picked-over ribcage. The tallest arm arches clean across the foredeck and curls down towards the bow lantern that is somehow still burning. Every arm is a stack of circular cross-sections that shrinks and drifts sideways as it climbs, which is a technique worth owning even if you never build another sea monster.
What you need
| Block | Count |
|---|---|
| Water | 2765 |
| Dark prismarine | 1277 |
| Prismarine | 525 |
| Gravel | 495 |
| Dark oak planks | 258 |
| Sand | 205 |
| Spruce planks | 123 |
| Spruce log | 75 |
| Sea lantern | 75 |
| Dark oak log | 74 |
| Prismarine bricks | 59 |
| Light gray wool | 32 |
| Prismarine slab | 9 |
| Dark prismarine slab | 3 |
| Lantern | 1 |
Counts are exact for the model above. Mine a little spare — nobody places every block first time.
Building it
Each stage names the layers it covers. Drag the slider on the model to that layer and you are looking at exactly what the stage describes.
1.Sea bed and the waterline
Lay a full 30x30 gravel bed, drop three sand patches into it, then flood y1 to y4 so the surface sits on top of y4. Every height that follows is read off that line. Scatter spruce planks, prismarine bricks and a few sea lanterns across the western half of the bed: that is the debris field from the missing stern, and the sunken lanterns give the water something to glow through from below. Everything built afterwards simply overwrites the water, so there is no need to carve pockets out of it.
2.The heeled hull
The hull is a single wedge, pitched about 34 degrees bow-up and rolled 21 degrees to port, so no two cross-sections repeat. Read the layers rather than counting blocks. At y2 to y5 the hull appears as a long diagonal band because you are slicing a sloped ship; by y9 only the forward third still shows in the slice; by y12 nothing is left but the stem post spearing up at x22. Dark oak planks with spruce streaks above the waterline, and below it swap roughly a third of the blocks for prismarine and dark prismarine so the timber looks fouled where the sea has had it.
3.Ribcage, mast and torn sail
Where the stern tore away the planking simply stops on a ragged edge, and four spruce log frames stand bare over the open hold. Six more ribs lean out of the shallows to the west, tallest nearest the break. The mast leaves the deck perpendicular to it, which means that with the bow reared up it rakes backwards and to port, ending near y15 in splinters rather than a clean cut. Hang the yard at roughly two thirds of the mast and drape light grey wool from it, varying the drop from two to six blocks and punching holes through the lower half. The snapped topmast lies across the port side, resting on an arm.
4.Roots of the arms
Each tentacle starts as a sphere of radius three to three and a half centred on the sea bed, so half of it is buried and the arm looks like it is coming out of something rather than standing on it. Place six: a heavy one to the front left, the heaviest to the rear right, a curling arm behind, a short one off the starboard bow, a thin whip to the west, and one low coil laid across the flooded waist of the hull. At water level the cross-sections are fat near-circles six or seven wide. Break a ring of prismarine slabs around each one at y5 where the mass narrows; that half step reads as foam.
5.Climbing and tapering
This is the whole build. Every three or four blocks of height the circle loses about a quarter of a block of radius and, just as importantly, shifts one or two blocks sideways. Shrink at a constant rate without moving and you get a cone; move without shrinking and you get a pipe. Alternate the two. Keep the two-tone skin as you climb: dark prismarine over the convex outer face, plain prismarine along the concave inner face, with the occasional prismarine brick as mottle. Suckers go on the concave face only, a sea lantern every third block, doubled side by side while the arm is still wider than four.
6.The arch and the hooks
The rear-right arm leaves the water at z22 and crosses most of the build to break over the foredeck at y22 and y23, then curls back down to y18 finishing on a single dark prismarine slab. Nothing else is allowed above y20, which is what makes it read as the crest of the attack. The front-left arm rolls over at y19 and hooks back inboard; the rear arm curls forward and down onto its own trunk. Point every hook at something the eye already cares about, whether that is the deck, the snapped mast or the bow lantern, and the silhouette tells the story on its own.
Make it yours
- Build the wreck first and the arms last. Because later ops overwrite earlier ones, every place an arm crosses the hull it crushes the planking, which is exactly the right way round.
- A curve only reads as motion if it accelerates. Let each arm rise nearly straight for its first six blocks, then bend harder with every layer above y12 rather than turning at a constant rate.
- Keep suckers to one line along the concave face of each arm. A second line flattens the form and the whole thing starts to look like a runway rather than a limb.
- Slabs earn their keep at the two extremes: a half block on the end of an arm doubles the apparent taper, and a broken ring of prismarine slabs at y5 sells the splash without adding bulk.
- In survival, dark prismarine costs eight prismarine shards and black dye, so raid the monument before you start. Deepslate tiles with prismarine accents make a passable substitute if the guardians win.