How to build the Ice Cream Stand in Minecraft
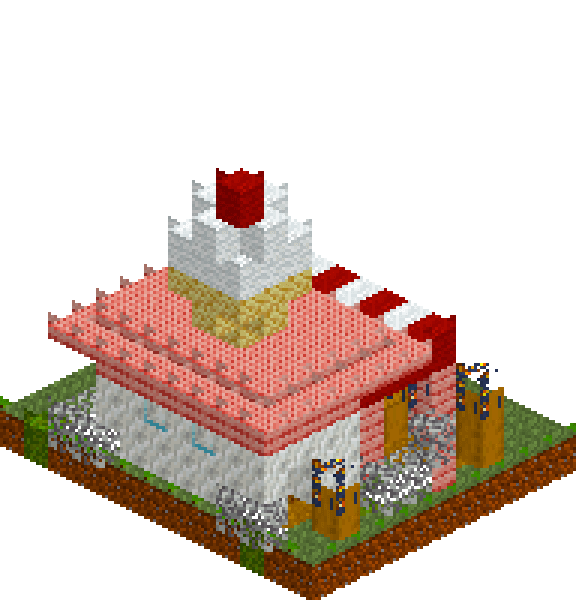
Seven blocks wide and mostly awning, this little kiosk trades on one joke: the cone on the roof is taller than the shop underneath it. Calcite walls keep everything quiet, a cherry-plank front supplies the pastel, and the red-and-white valance does all the shouting. It goes up in an afternoon but it rewards fussing — lanterns hung over the counter, a tub of strawberry on the back shelf, three stools pulled up to a quartz-slab ledge, a scruffy bed of moss and leaves down one side. Set it beside a village path or on a lakeshore and it looks like it has been selling cones there all summer.
What you need
| Block | Count |
|---|---|
| Cherry planks | 76 |
| Grass block | 61 |
| Dirt path | 41 |
| Spruce planks | 35 |
| Calcite | 31 |
| White wool | 30 |
| Cherry planks slab | 28 |
| Red wool | 18 |
| Sandstone | 15 |
| Oak leaves | 14 |
| Quartz block slab | 10 |
| Stripped oak log | 8 |
| Moss block | 6 |
| Glass | 6 |
| Lantern | 5 |
| Shroomlight | 1 |
Counts are exact for the model above. Mine a little spare — nobody places every block first time.
Building it
Each stage names the layers it covers. Drag the slider on the model to that layer and you are looking at exactly what the stage describes.
1.Ground, path and two scruffy beds
One layer op does the entire site. Grass across the whole 13 by 11 plot, then a dirt-path forecourt that widens as it comes towards you — seven wide at the far edge, eleven at the front — so the approach funnels the eye straight at the counter. Spruce planks fill the kiosk footprint at x3 to x9, z5 to z9, giving the interior a floor rather than trodden grass. Two moss patches go in off to the sides, deliberately uneven: two blocks on the left, two on the right but not opposite each other. A path spur runs out from the right at z8 and z9, which is where the side door will land.
2.The kiosk box, counter and stools
Fill a solid calcite block from y1 to y4 across the footprint, then clear the middle out — walls one thick, no ceiling, because the roof deck comes later. Re-skin the front face at z5 in cherry planks: that single change is the whole pastel. Two cherry posts stand three blocks out in front at x3 and x9, z2, which is what lets the awning reach forward over the stools. The counter is an apron of cherry planks at z4 topped with quartz slabs running across z4 and z5, so the ledge outside and the sill inside are one continuous half-height surface. Log-and-slab stools sit at z3, right up against it.
3.Windows, fascia and the scalloped fringe
Cut the serving hatch two blocks tall through the cherry front — the quartz slab already sitting in it leaves a generous open slot. A two-by-two glass panel goes in the left side wall, pushed towards the front rather than centred, and a narrow strip of glass lights the back. At y4, wrap a cherry band round the top of the walls and lay a bold red fascia across the front above the hatch. The scallop is made here, not on the awning: red wool drops at x4, x6 and x8 on the z2 line only, leaving gaps between them so the valance reads as a row of hanging teeth. Hang lanterns at x3 and x9 on z3.
4.Striped awning and the soft roof rim
Everything at this level is one layer op. Rows z2 through z4 alternate red and white by column, red at x3 and finishing red at x9 — stripe by column, never by row, or the pattern only reads from a bird's-eye view. Behind it the roof deck runs in cherry planks over z5 to z9, and the rim on all three outer edges is cherry slabs instead of full blocks. That half-height edge is doing a lot of work: it stops the roof looking like a lid and softens the silhouette against the sky. The back edge at z10 is slabs the whole way across for the same reason.
5.The cone: wafer, swirl and cherry
The whole point of the build, and it is deliberately taller than the shop. It starts as one sandstone block at x5, z7 — one left of the roof's true centre, which is the difference between a shop model and something built by hand. Flare it to a plus of five sandstone at y7, then a full three-by-three at y8: point down, wide at the top, exactly like a wafer. White wool takes over for the scoop at y9, steps in to a two-by-two at y10 pushed towards the front-right corner so it leans like soft-serve rather than stacking like a cube, and one red wool block sits on top as the cherry.
Make it yours
- Stripe the awning by column, not by row - red on x3, x5, x7, x9 and white between. Striping by row looks correct from above and like nothing at all from the front, which is the only angle anyone sees it from.
- Keep the fringe gaps at x5 and x7. Dropping a red block at every column turns the scalloped valance into a solid red box and you lose the whole effect for the sake of three blocks.
- The counter works because the quartz slabs cross both z4 and z5 in one pass, so the outside ledge and the inside sill are the same surface. Build the cherry apron at y1 underneath first or the slabs read as floating.
- Nudge the cone one block left of the roof centre and put the cherry off the swirl's axis. Perfect symmetry at this scale reads as a display model rather than a stand somebody actually runs.
- For a mint-and-blueberry version, swap cherry planks for warped planks and red wool for blue. The palette is only two colours deep, so the whole build re-skins in about four ops.