How to build the Stone Arch Bridge in Minecraft
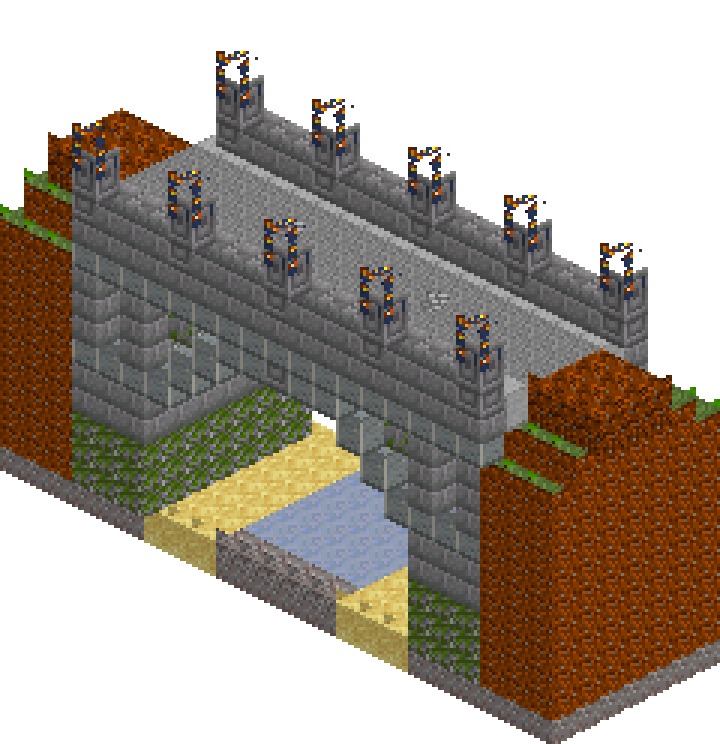
Most Minecraft bridges are a flat slab on legs. This one is built the way a mason would build it: a solid block of stone brick with a semicircular opening cut through the middle, so the arch is a real curve carrying real weight rather than a decoration hung off a walkway. The soffit is lined in cobblestone, the ring stands proud of a recessed spandrel, and a projecting andesite cornice throws a hard shadow line the full length of the deck. Lanterns on the parapet posts light it after dark. Twenty-three blocks end to end, and it drops straight into any river valley.
What you need
| Block | Count |
|---|---|
| Dirt | 384 |
| Stone bricks | 288 |
| Polished andesite | 181 |
| Mossy cobblestone | 135 |
| Gravel | 94 |
| Stone | 49 |
| Cobblestone | 48 |
| Sand | 42 |
| Smooth stone | 34 |
| Clay | 25 |
| Mossy stone bricks | 24 |
| Grass block | 24 |
| Chiselled stone bricks | 22 |
| Coarse dirt | 18 |
| Lantern | 14 |
Counts are exact for the model above. Mine a little spare — nobody places every block first time.
Building it
Each stage names the layers it covers. Drag the slider on the model to that layer and you are looking at exactly what the stage describes.
1.Riverbed and both banks
Gravel across the whole footprint at y=0, then a shoal of sand at each springing point and a patch of clay in the deepest part of the channel. Three materials on the bed stop the water reading as a flat grey floor once it is flooded. The banks are a solid mass of dirt from y=1 to y=8 at each end, then stepped upward: grass at y=9 on the outermost rows, y=10 one row in, and a coarse dirt path at y=11 down the middle three. That stepping is the whole trick — the shoulders fall away from the road the way real ground does, and the path arrives at exactly deck height, so nothing has to be fudged when the two meet.
2.One solid block of stone
Fill x=3 to x=19, y=1 to y=11, the full seven blocks deep, with stone bricks. Carving an arch out of a solid mass is far easier than trying to build a curve in mid-air, and it guarantees every stone in the ring lands where it is supported. Then swap the bottom three courses for mossy cobblestone. That is the waterline, and stone that spends its life wet never stays clean — the change of material at a fixed height does more for believability than any amount of scattered detail higher up.
3.Cutting the arch
Take the two outer faces off the span first: clear z=0 and z=6 between x=6 and x=16 up to y=9, then face the newly exposed z=1 and z=5 in mossy stone brick. That sets the spandrel one block back, so the ends of the bridge read as solid abutments rather than more of the same wall. Now cut the opening a column at a time, following a circle of radius five struck from x=11. The heights are 5, 6, 7, 8, 8, 8, 8, 8, 7, 6, 5. Those eleven numbers are the entire arch. Three quick steps of rise near the springing, then a flat crown — that is genuinely what a semicircle looks like in whole blocks, and smoothing it out only makes it look wrong.
4.Cobblestone soffit and arch ring
Line the underside of the opening with cobblestone one block thick, sitting directly on the void at every column: y=6 at x=6, y=7 at x=7, and so on up to y=9 across the crown. Rougher stone under an arch is not just decoration — it separates the curve from the dressed facing and gives the underside something to read against when you look up from a boat. A few mossy cobblestone blocks in the centre of the crown finish it. On the two faces, run the ring in polished andesite along the same curve: a diagonal from y=6 to y=8, a straight band of five across the top, then back down. A chiselled stone brick keystone at x=11 marks the centre.
5.Abutment bands and lit niches
Run a course of polished andesite across both abutments at y=6 — the exact height the arch ring springs from. Carrying a line out of the curve into the flat masonry either side is the detail that makes a bridge look designed rather than assembled, and it costs six blocks. Then cut a narrow niche three blocks tall into each abutment face at x=4 and x=18, from y=7 to y=9, and drop a lantern in behind it at z=1 and z=5. One block of depth is enough: the light spills out of a shadowed slot instead of sitting flat against the wall, and at night the flanks glow without a single visible light source.
6.Cornice and roadway
A single course of polished andesite at y=10, running the full seven blocks wide from x=3 to x=19, is the most valuable block in the build. It overhangs the recessed spandrel by one, so the whole length picks up a hard horizontal shadow, and it caps the arch cleanly instead of letting the curve dribble into the deck. The road goes on at y=11: smooth stone kerbs on z=1 and z=5, plain stone between them, and a couple of cobblestone blocks worked into the centre line as wear. Coarse dirt carries the path across the last three columns at each end, so the surface changes before the parapet does.
7.Parapet, posts and lanterns
Keep the parapet low — one course of stone brick at y=12 on z=0 and z=6. Two courses wall the deck in and hide everything underneath it. The rhythm comes from posts instead: chiselled stone brick at x=3, 7, 11, 15 and 19, taken up to y=13, with a lantern on top at y=14. Four blocks apart is close enough to read as a repeating order from the far bank and far enough apart that the crossing still feels open. The end posts land on the abutments and the middle one sits directly over the keystone, which is an alignment worth keeping if you ever change the span.
Make it yours
- If the arch reads squashed, the fault is the crown, not the curve — drop x=9 and x=13 by one so the flat top is three wide instead of five, and the whole span lifts.
- Deepslate bricks in place of stone bricks, with the ring left in polished andesite, turns this into a mountain-road bridge without touching a single coordinate.
- To make it multi-arch, copy x=3 to x=16 and paste it at x=17, then rebuild the far abutment. Give the intermediate piers three blocks of width, not two — thin piers are what make long stone bridges look like scaffolding.
- Swap the mossy stone brick spandrels for plain if your river runs fast and cold. Moss reads as still, shaded water, so it belongs on a lowland stream rather than a glacier melt.
- Sink the abutments two blocks into your own banks before you place anything else. A bridge sitting on top of the terrain rather than cut into it never looks right, whatever you do to the arch.