How to build the Wither Shrine in Minecraft
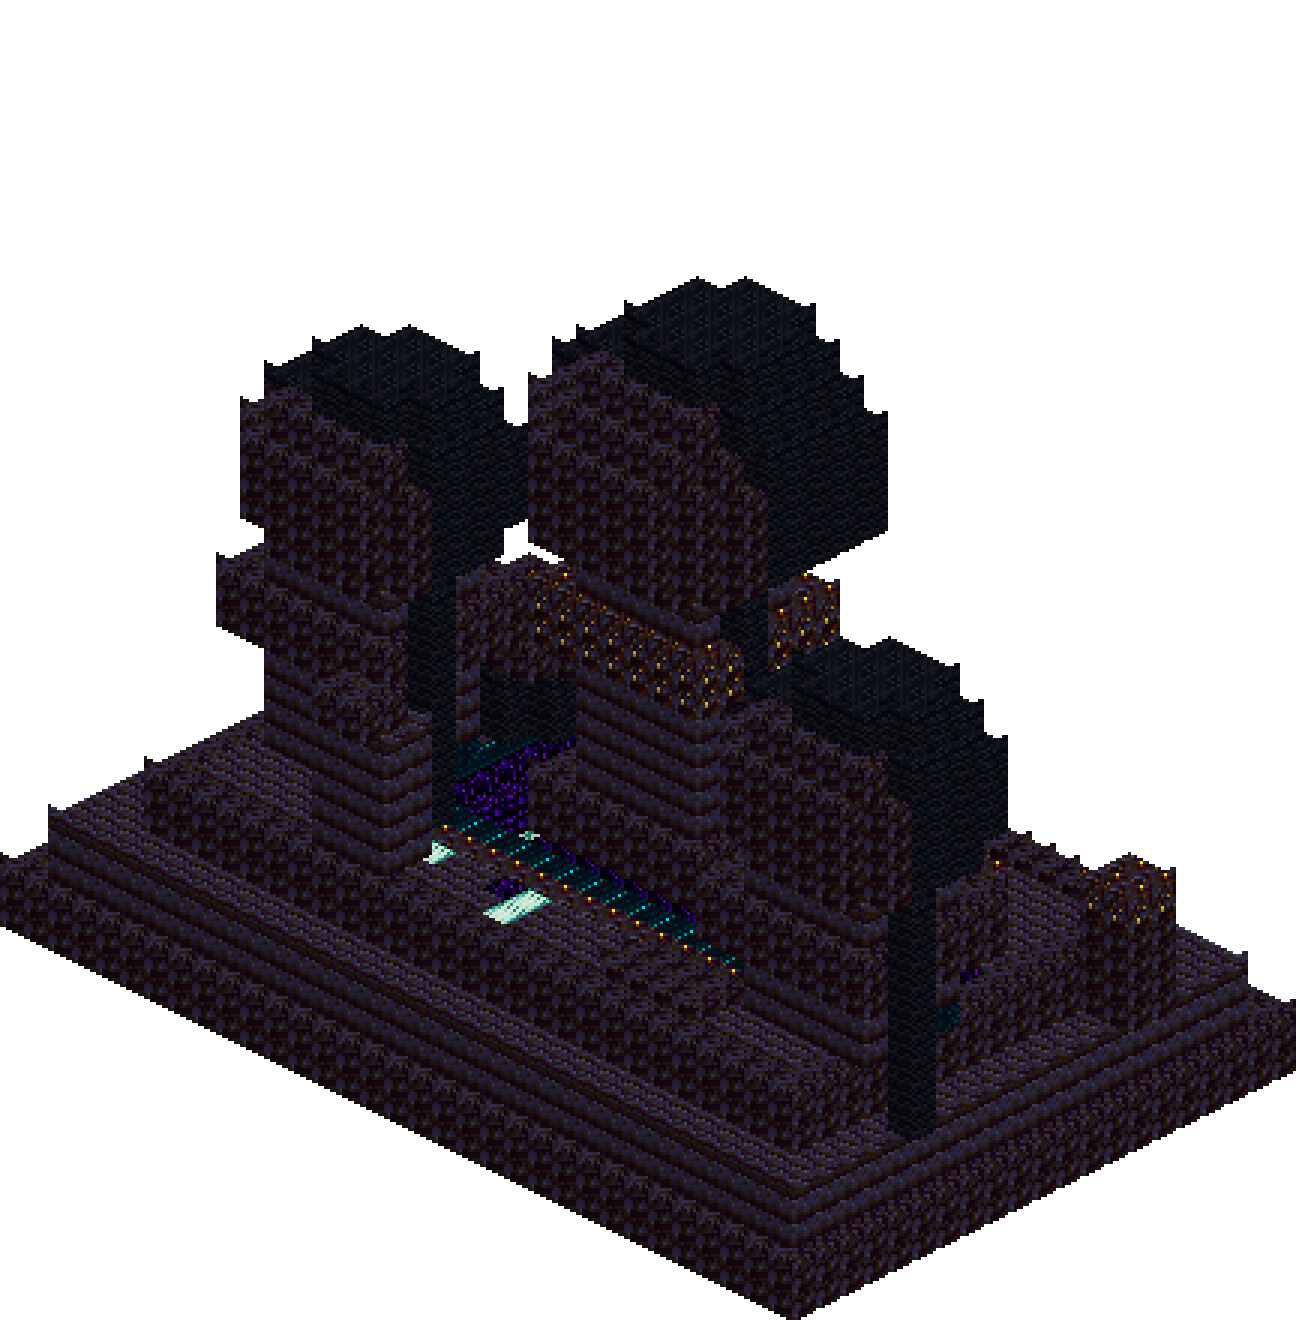
A shrine raised by whatever kept the Wither's heads after it fell. Three blackstone pillars carry three sculpted skulls at three different heights, each with sea lantern eyes and a band of gilded blackstone across the brow, all leaning in over a sunken pit whose floor is solid light. A fourth pillar has snapped; its head lies on the flagstones at the front, still burning. Nothing here is lit from above — the glow climbs out of the ground and finds the eye sockets on its way up.
What you need
| Block | Count |
|---|---|
| Blackstone | 2114 |
| Polished blackstone bricks | 1501 |
| Black wool | 740 |
| Crying obsidian | 209 |
| Gilded blackstone | 156 |
| Sea lantern | 138 |
| Blackstone slab | 55 |
| Sculk | 51 |
| Calcite | 10 |
| Soul sand | 5 |
Counts are exact for the model above. Mine a little spare — nobody places every block first time.
Building it
Each stage names the layers it covers. Drag the slider on the model to that layer and you are looking at exactly what the stage describes.
1.The stepped altar
Three boxes, each smaller than the last: raw blackstone across the whole footprint at y0-1, polished blackstone bricks inset two blocks at y2-3, then blackstone again at y4-5 for the terrace itself. A single layer op at y5 does every scrap of decorative work — a gilded blackstone frame ringing the ground the pit will occupy, a band of sculk creeping outward from it, and a scatter of sea lantern set flush into the flagstones as cracks. Lay that pattern now, before anything is carved; the pit removes its middle later and leaves you the frame, which is exactly the result you want and far more painful to cut by hand.
2.The burning pit
Do not dig a hole. Drop a solid plug of crying obsidian straight down through all three steps, x10-22 by z4-12, then clear its inside. What is left is a shaft with walls exactly one block thick, no gaps and no guesswork. Replace the floor with sea lantern, then break the light up: two islands of soul sand and a lump of crying obsidian on top of it, so the glow pools rather than spreading evenly. Run a vein of sea lantern through the walls at y3 to underlight the rim. Two extra clears then bite chunks out of that rim, one at the back left and one at the front right, so the opening never reads as a rectangle.
3.The fallen head
The head from the fourth pillar lies on the flagstones at the front left, and it is worth building before the big ones because it teaches the whole method at a quarter of the size. Four cross-sections: a five-by-five pad at y6, the same footprint at y7 with two sea lantern eyes set into the front row, a narrower slice at y8 carrying the gilded brow, and a small cap at y9 with its back half in blackstone. Read the layer strings front to back — the first row is the face — and the eye placement becomes obvious rather than something you count out twice and still get wrong.
4.Three heads, section by section
Every head is a stack of horizontal slices, widest through the middle. The side heads take seven: a narrow jaw pushed forward, a slice with calcite teeth in the front row, then three full seven-wide sections carrying the eye slits and a gilded brow band directly above them, then two that pull back in to round the crown. The centre head is that same shape scaled to nine wide, eight deep and nine tall, and its eyes get two rows instead of one so it out-stares the other two. From the fifth row back the wool switches to blackstone, which mottles the back and crown instead of leaving a flat black lump. Because the three sit at y12, y14 and y18, most layers draw two heads at once.
5.Pillars, collars and chains
Shafts go in after the heads, so the overhang is undeniable — every skull is two blocks wider than the pillar holding it. Five by four each: the centre one climbs fifteen blocks straight out of the pit floor, the left stops at y13, the right at y11. Add a sculk band at each foot, a vertical seam of crying obsidian up each front face, and a blackstone collar a block proud of the shaft just under each jaw, gilded on the centre pillar only. The chains are single columns of black wool. Two rise off the pit floor to the centre jaw; the rest hang beside the outer heads, each stopping at a different height.
6.Approach and ruin
A slab step at the front edge of the ground, a second at the terrace face, and a slab kerb along the top lip. Sea lantern let into the terrace face either side of the stair lets the pit register from ground level, before you can see down into it. Everything else is deliberate damage: the stump of the fourth pillar at the back left with a jagged blackstone break across its top, its rubble strewn as slabs on the far side of the terrace, and one lone obelisk still standing off the right edge with a gilded cap. Leave the left side bare. The imbalance is the point — pair that obelisk and the whole thing goes inert.
Make it yours
- Mock the left head up on flat ground first. Seven cross-sections are far easier to correct at eye level than fourteen blocks up a pillar with a scaffold under you.
- Place the sea lantern eyes last, once each head is fully closed. A lit socket makes the surrounding wool look thinner than it is and you will carve away mass you actually need.
- Keep the three crowns at different heights and resist the urge to tidy them. Level them off and the silhouette stops being a wither and starts being a fence.
- Black wool and blackstone sit close in tone but nowhere near in texture. Wool on the faces that catch light, blackstone on the backs and crowns, and the heads mottle instead of flattening into slabs.
- Every light source belongs in the pit or in an eye socket. If terrace spawns bother you, cover the flagstones with blackstone slabs rather than adding torches — one torch up top and the glow-from-below effect dies.